")
")


- Stock: In Stock
- Product code: 45764629790953
- Weight Brutto: 11.00kg
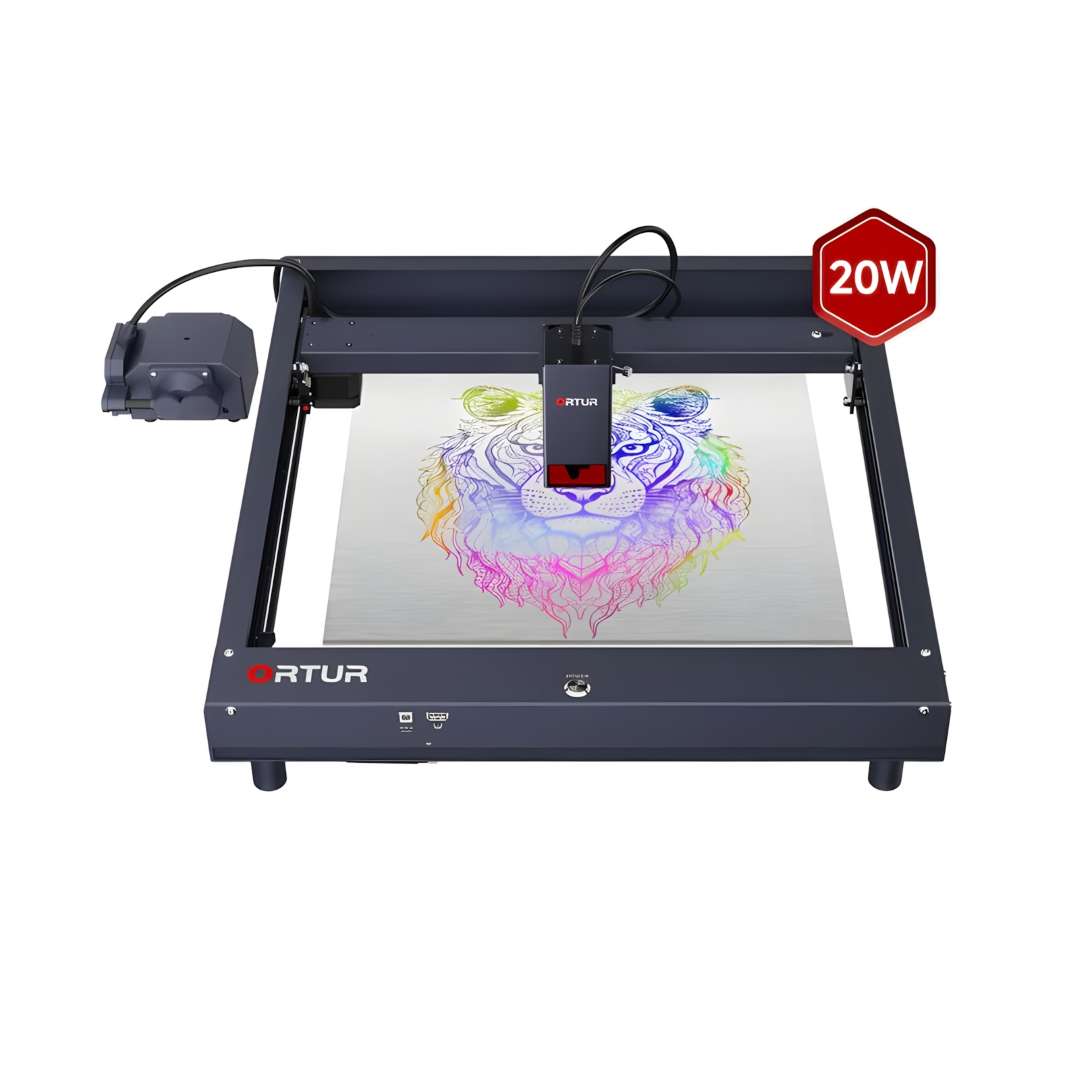
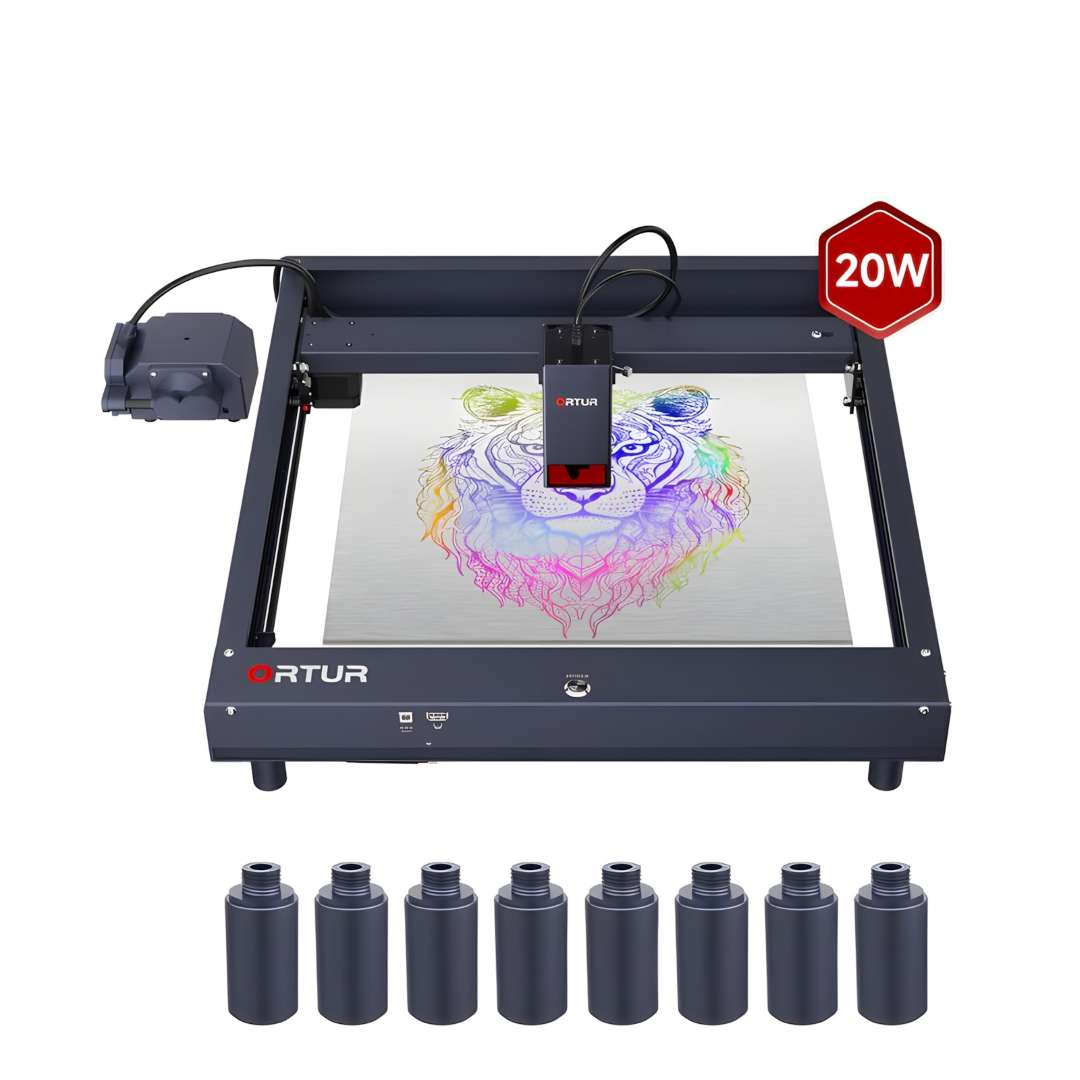
The Ortur Laser Master H10 20W is a desktop diode laser engraver and cutter built for cutting acrylic, wood, and stainless steel with fast job turnaround. Four compressed 5 W diodes merge into a single focused beam, so the module reaches true optical density rather than nominal wattage. The frame ships pre-assembled and ready to run within minutes of unboxing. Built-in air assist and a six-layer safety system round out the platform.
| Specification | Value | Why it matters |
|---|---|---|
| Optical Power Output | >20,000 mW (LU3-20B module) | Four compressed diodes concentrate rated wattage into a small spot, giving deeper single-pass cuts than a typical single-source 20 W module. |
| Engraving Area | 300 × 300 mm | Covers most desktop workpieces — signage blanks, coasters, small enclosures — without repositioning the material. |
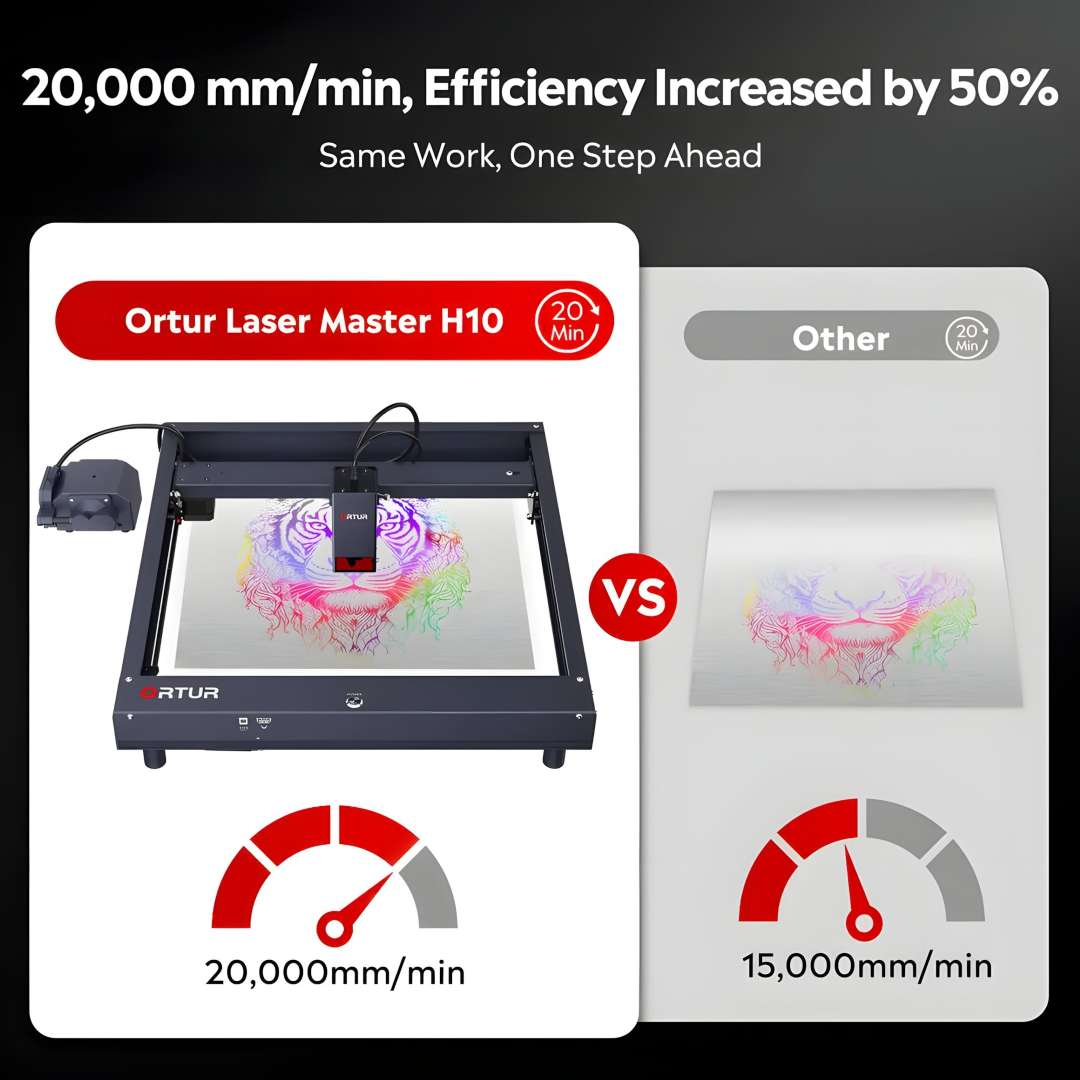
| Maximum Engraving Speed | 20,000 mm/min | Cuts identical jobs roughly 50% faster than machines capped at 15,000 mm/min. |
| Laser Spot Size | 0.1 × 0.12 mm | A finer spot sharpens grayscale photo engraving and narrows the kerf on cut edges. |
- Quad-diode compression: four 5 W diodes merge into one 445 nm beam, so power density approaches that of a single high-output diode rather than a simple wattage sum.
- Flat-pressed X-axis frame: the gantry beam sits flush along its full length, so line straightness holds up at higher travel speeds instead of bowing under acceleration.
- Built-in air assist: the pump and tube are integrated at the factory, so no aftermarket air-assist kit is needed before the first cut.
- Six-layer safety monitoring: firmware, USB, current/voltage, exposure, tilt, and motion checks run independently of the host software, disabling the laser the moment any one check fails.
Technology & Hardware Design
Raw diode wattage alone does not determine cutting depth — optical power density at the focal point does. The H10's four-diode compression architecture, flat-pressed frame, and integrated air assist are all built around that principle.
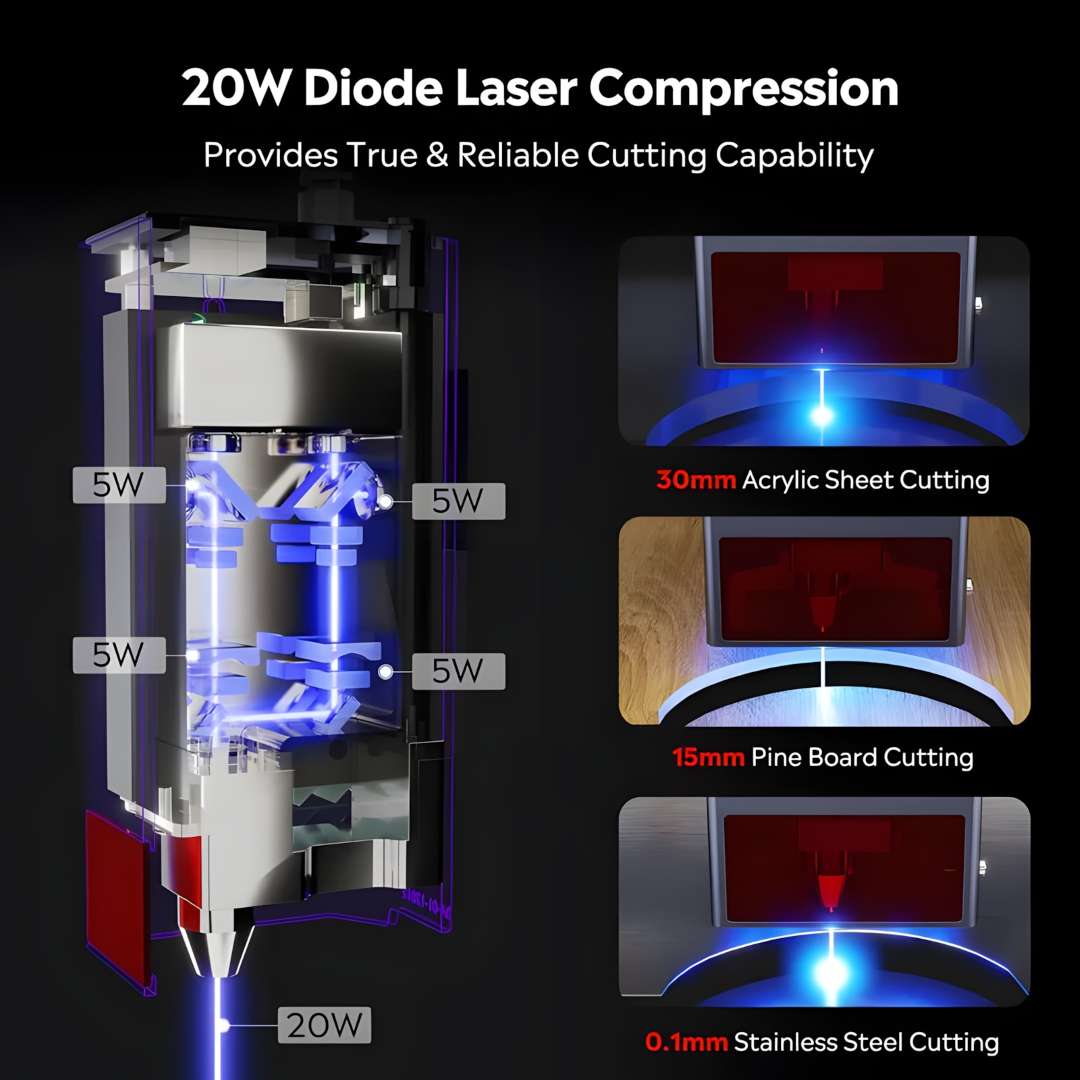
Quad-Diode Compression for True 20 W Output
Four independent 5 W diodes merge optically at a single 445 nm focus, producing a compressed output rather than four separate weak beams. Measured benchmarks include a single-pass cut through 30 mm black acrylic, 15 mm pine board, and scribing on 0.1 mm stainless steel. Compressing four beams into a 0.1 × 0.12 mm spot yields roughly 3× the power density of a single-source 20 W diode with a 0.19 × 0.21 mm spot at the same rated power.
The diagram below breaks down the compression optics alongside the three material benchmarks that back the power claim.
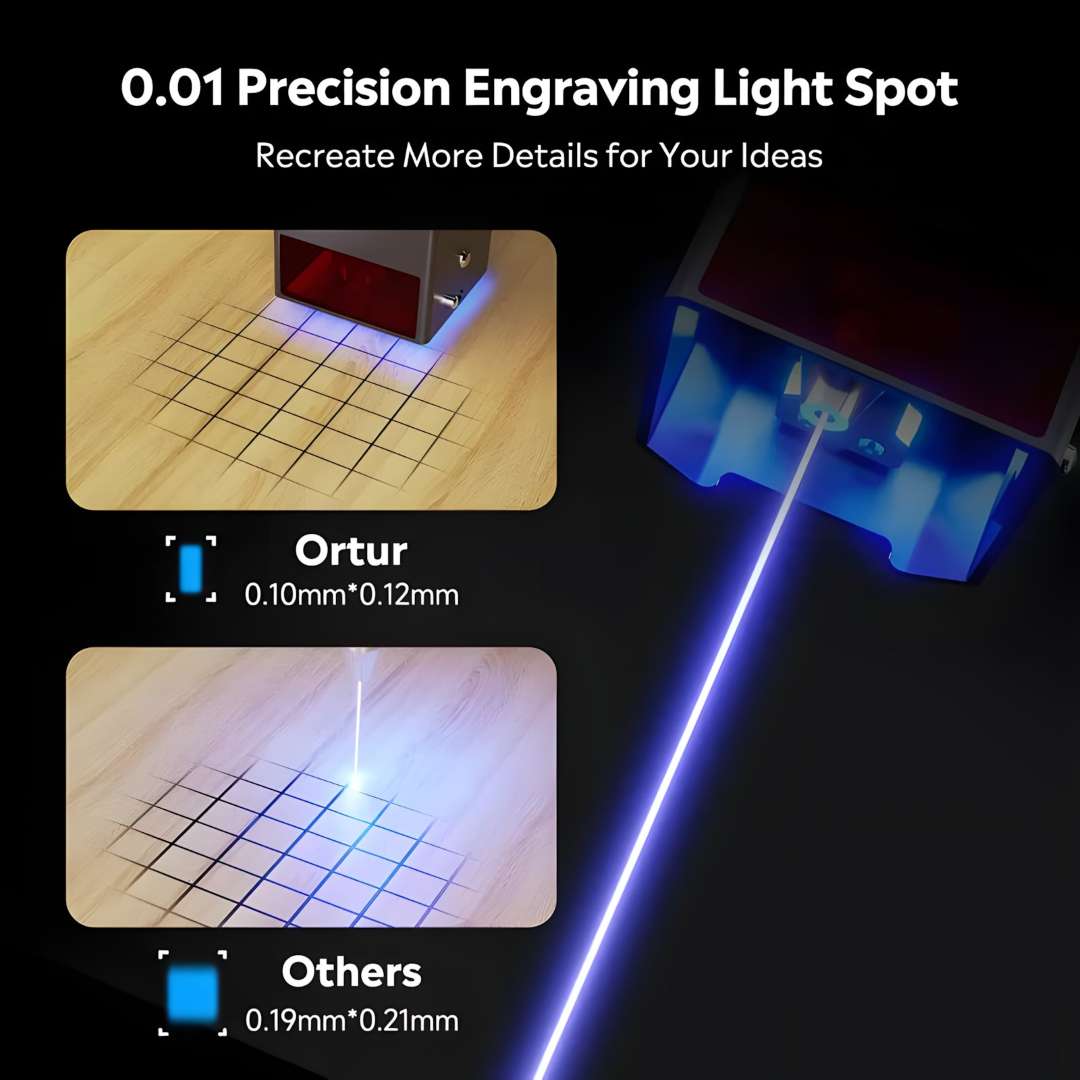
Precision Spot Size for Fine Detail
Spot size governs how fine a line or grayscale gradient can render. At 0.1 × 0.12 mm, the focused spot covers roughly half the area of a typical single-source 20 W module's 0.19 × 0.21 mm spot. A smaller spot concentrates more energy per unit area, producing cleaner kerf edges and sharper tonal transitions in photo engraving.
The comparison below places both spot sizes on the same grid, the H10's beam on the left against a generic 20 W competitor on the right.
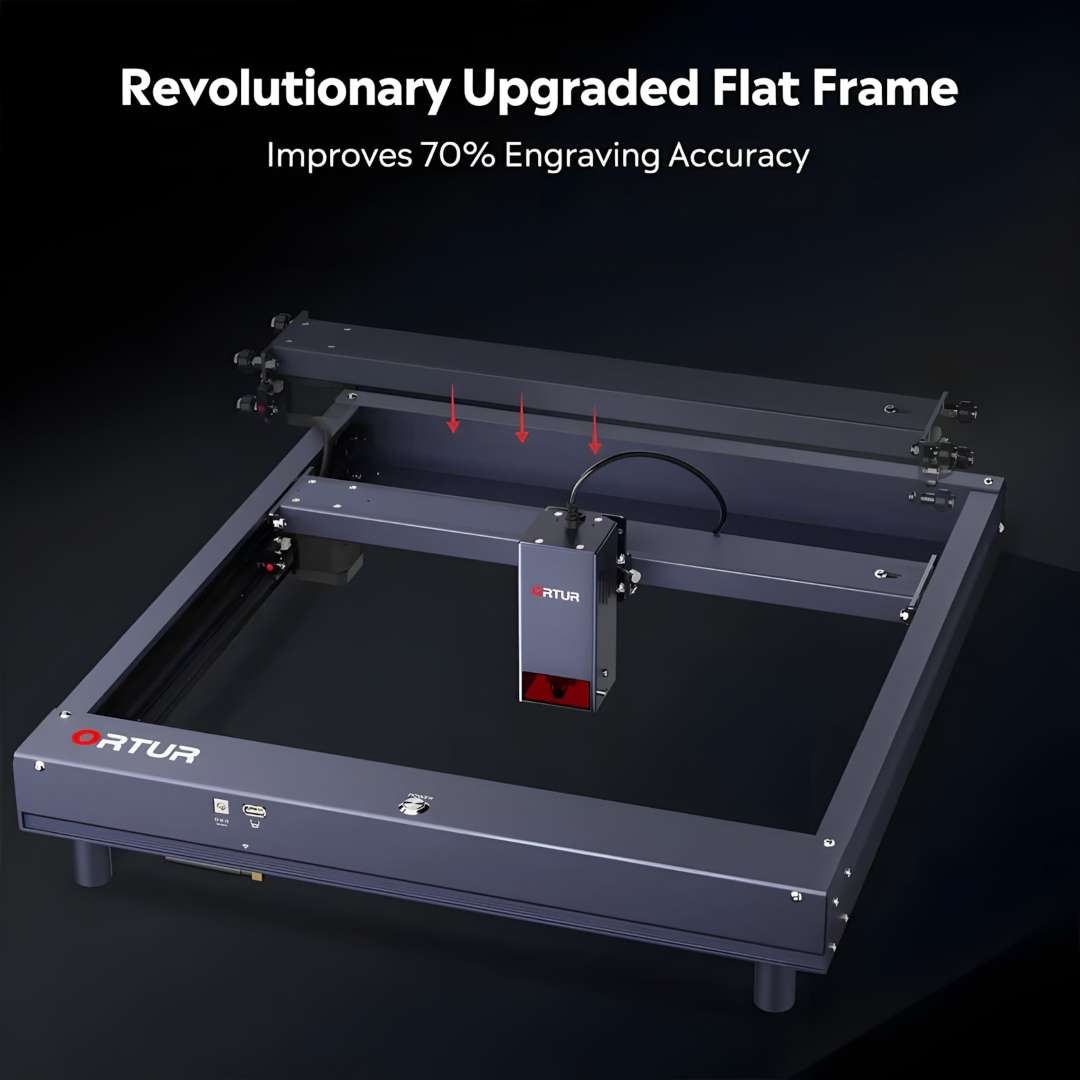
Flat-Pressed Frame for Accuracy
Most budget laser frames let the X-axis gantry beam flex under acceleration, degrading line straightness above 10,000 mm/min. The H10 uses a flat-pressed X-axis assembly constrained flush along its full length, eliminating the bow found in standard slot-extrusion frames. Ortur reports a 70% accuracy improvement over its previous H-frame generation. NEMA 17 stepper motors deliver 12.5 µm mechanical precision on both the X and Y axes.
The image below marks the three contact points where the beam is locked flush — the structural change behind the accuracy gain.
High-Speed Engraving Throughput
Travel speed sets how many pieces a workflow produces per hour. At a peak of 20,000 mm/min, Ortur's timed benchmark finishes identical artwork roughly 50% faster than a machine capped at 15,000 mm/min. Within the same 20-minute window, the faster pass also shows less char spread on wood and acrylic edges, since less cumulative heat is applied per line.
The comparison below documents this differential — the same job, same 20-minute window, at two different travel speeds.
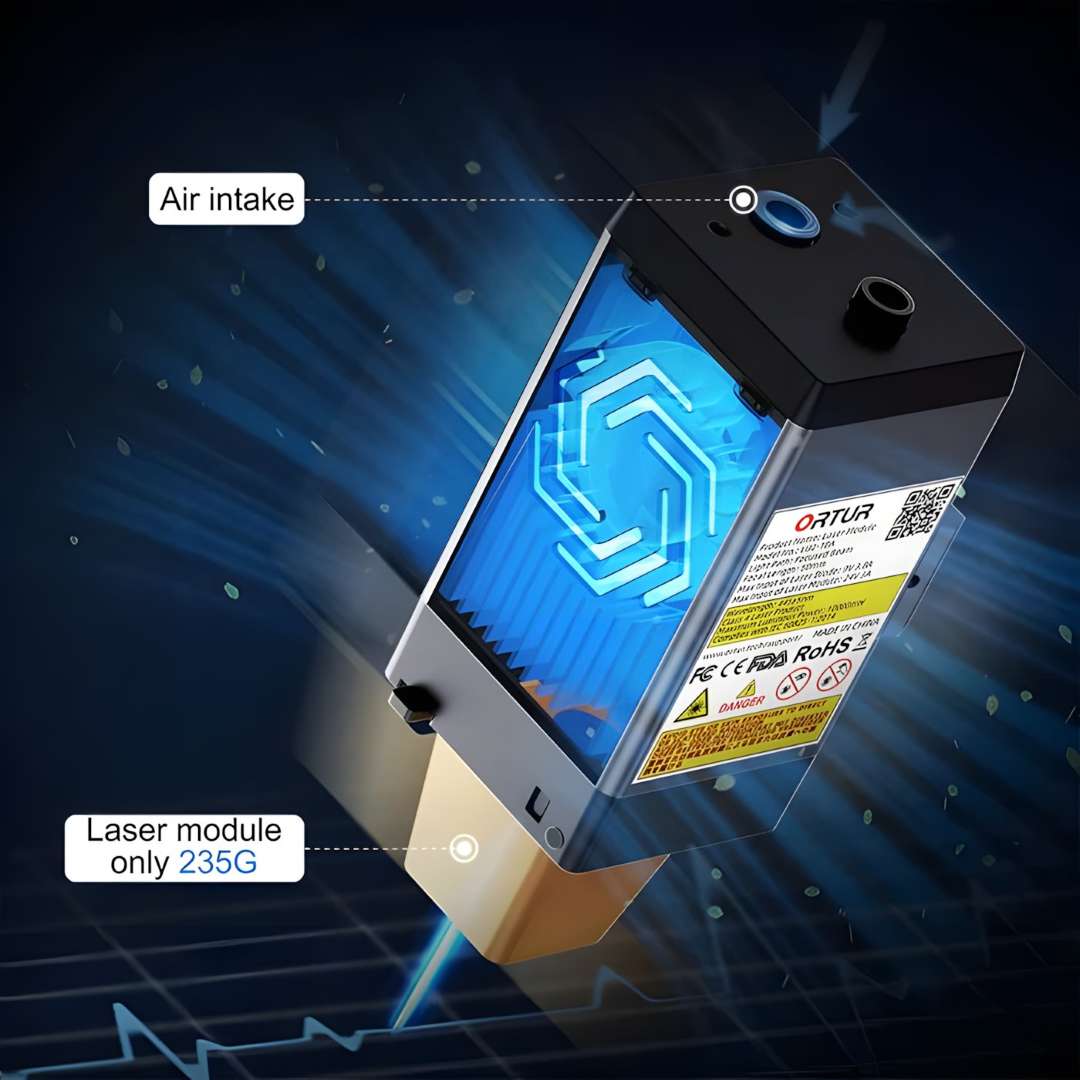
LU3-20B Laser Module
The removable LU3-20B module weighs 235 g, keeping carriage mass low — one reason the H10 sustains 20,000 mm/min without resonance artefacts. An S-curve air duct channels intake air across the internal optics, continuously flushing smoke residue from the lens cavity. Focal length is fixed at 46 mm from the heat sink face to the substrate, and a quick-focus stick sets this distance without measuring tools.
The close-up below shows the air intake port, the internal airflow path, and the certification label on the housing.
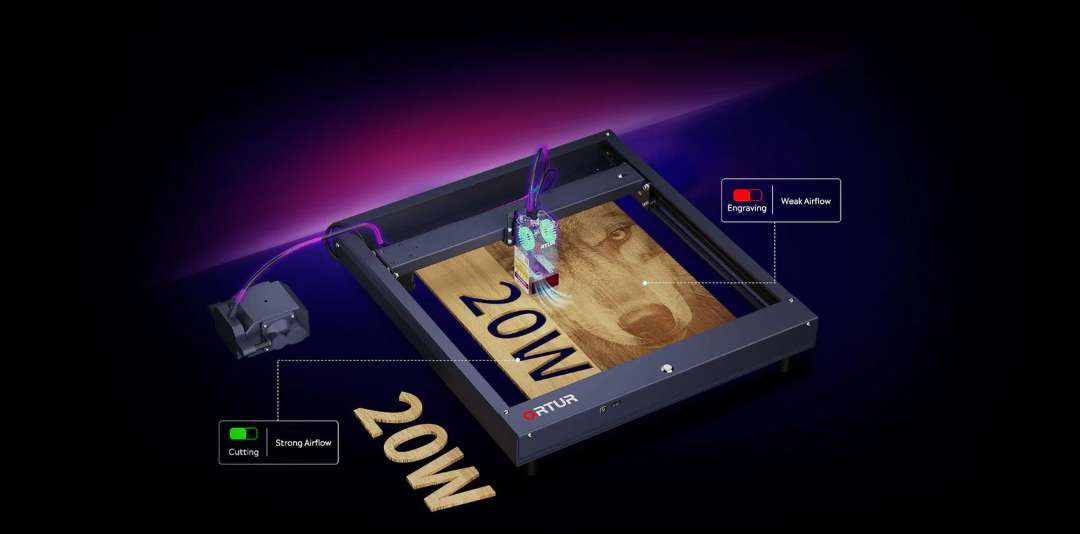
Built-In Air Assist System
The H10 ships with an integrated air tube routed through the laser module, so no aftermarket retrofit is needed. In cutting mode, the external pump delivers 40 L/min of airflow that clears combustion gases from the kerf, reducing burn marks and extending cut-through capability. In engraving mode, a reduced airflow setting protects the lens without over-cooling the focal zone, preserving grayscale tonal response. Switching modes is a software parameter, not a hardware change.
The diagram below shows the air assist routing, with labelled modes for cutting and engraving.
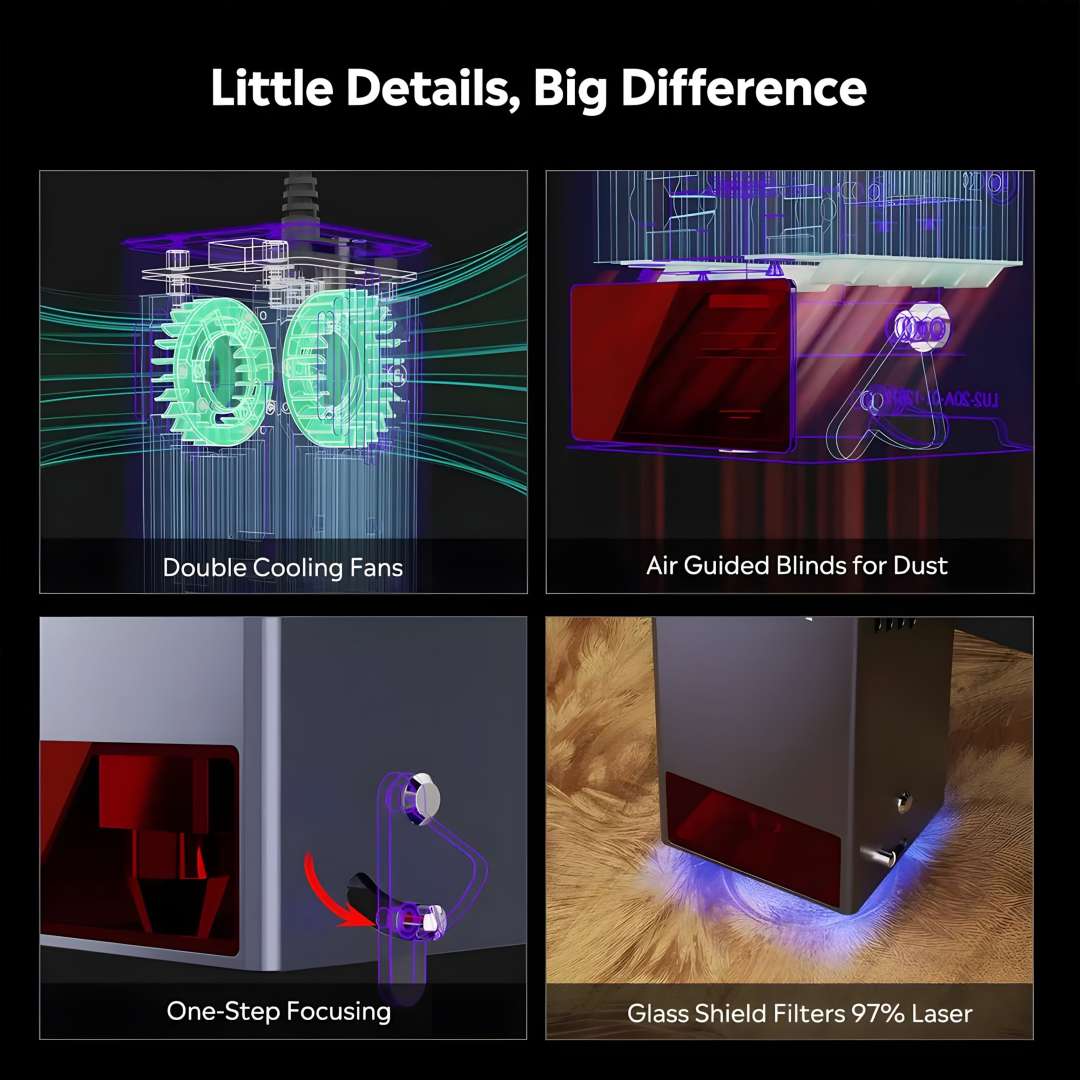
Module Longevity Features
Four subsystems extend the module's service life: dual 10,000 rpm cooling fans that pull heat away from the diode stack; air-guided blinds that use positive pressure to flush smoke particles from the lens well; a one-step focus mechanism that sets focal distance without calipers; and a glass laser shield that blocks 97% of 445 nm scatter, protecting the operator from stray beam exposure.
The detail panel below illustrates all four subsystems in one view.
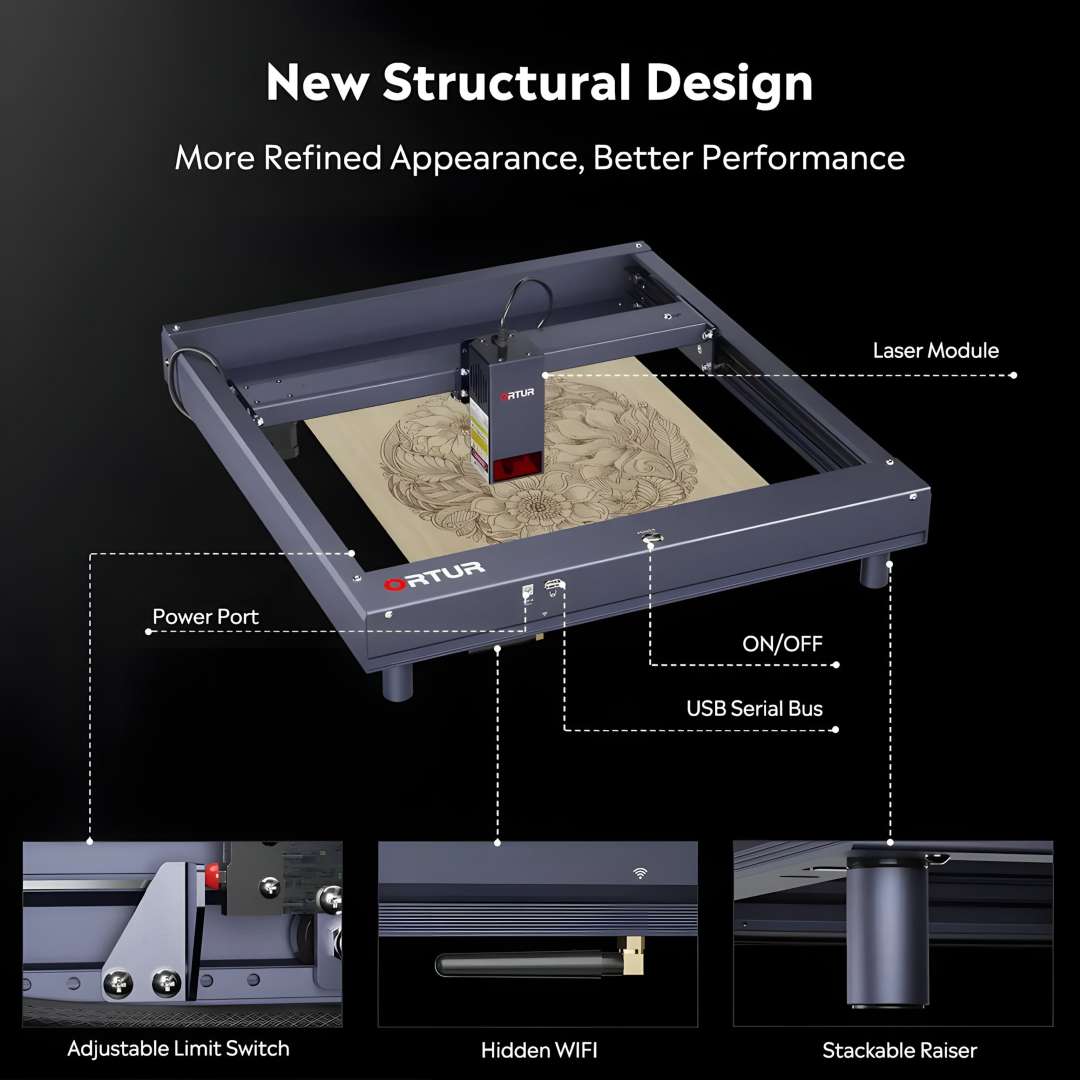
Structural Interfaces & Stackable Risers
The front panel consolidates a power port, a USB serial bus, and the main ON/OFF button. A 2.4 GHz WiFi antenna mounts flush inside the rear frame, keeping cabling clean. An adjustable limit switch on the left rail accepts different laser module heights, so recalibration after a module upgrade needs no extra hardware. Eight cylindrical aluminium risers thread into the foot sockets, lifting the machine by up to 400 mm for tall workpieces such as mugs or thick timber blocks, then nest underneath the frame when not in use.
The annotated view below labels each front-panel interface and shows the limit switch, WiFi cavity, and a fitted riser.
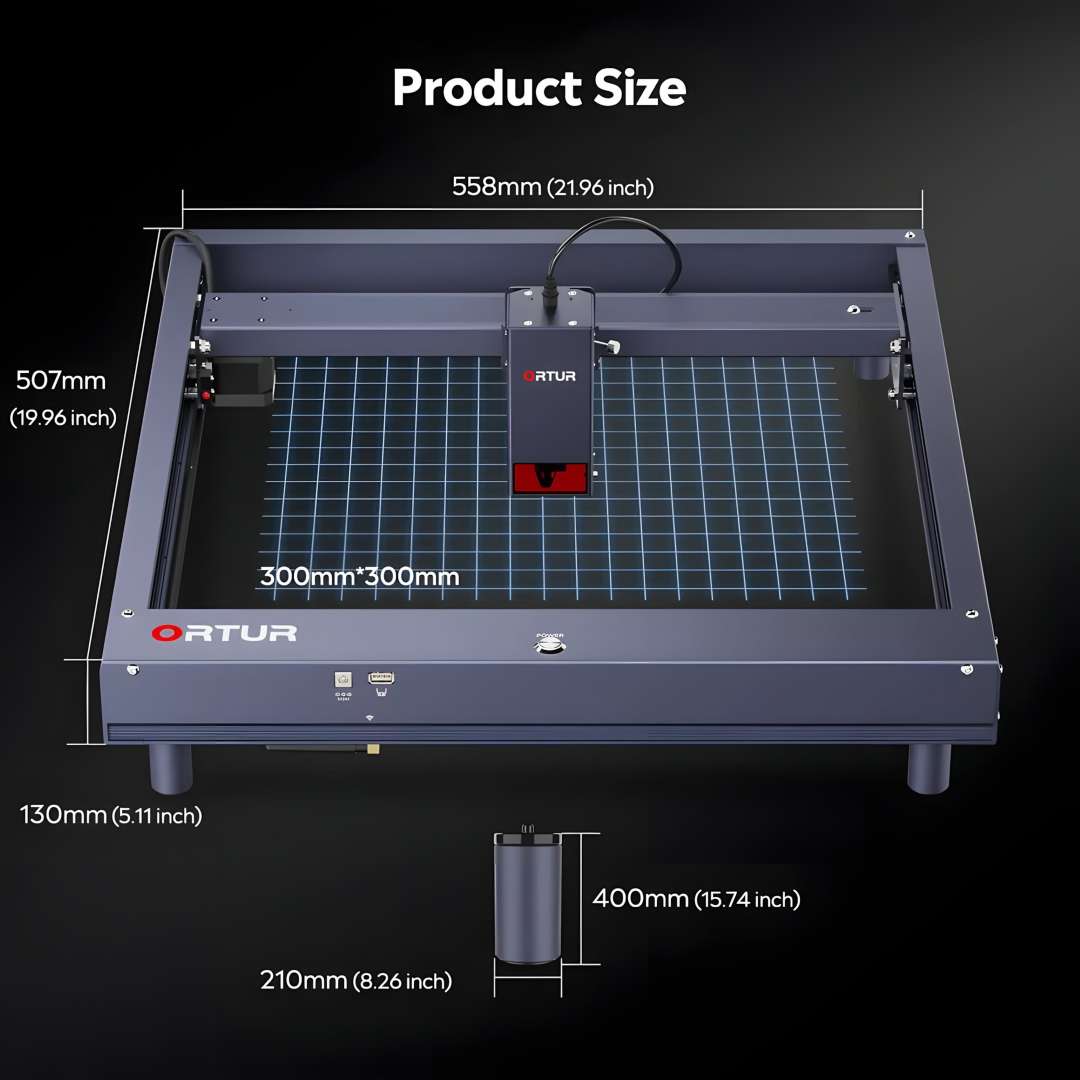
Footprint & Riser Dimensions
The base machine measures 558 × 507 × 130 mm with standard feet fitted. Each riser adds 210 mm diameter × 400 mm height — figures needed for bench space planning and clearance with tall workpieces.
The dimensions diagram below confirms the machine footprint and the separate riser measurements.
Software & Automation
The H10 connects via USB, 2.4 GHz WiFi, SD card, and FTP, covering tethered studio workflows and standalone operation from a TF card with no computer attached. Three software tiers cover Windows, macOS, and Android:
- Ortur App — a self-developed Android application with real-time preview and parameter management.
- LaserGRBL (free) — an open-source GRBL sender for Windows XP through Windows 10, a straightforward starting point.
- xTool Studio (paid) — professional-grade software with layer control, camera alignment, and variable power curves; compatible with Mac and Linux.
On Windows 7 or 8, install the Zadig Espressif CDC driver before connecting xTool Studio or LaserGRBL — without it the machine enumerates as a mass-storage device and the COM port never appears. Once configured, the 2.4 GHz WiFi WebUI at the machine's DHCP address gives a reliable fallback connection for long jobs. For stainless steel colour marking, starting at 20,000 mm/min and stepping power up in 5% increments shifts the oxide layer through gold, purple, and blue; a printed speed-power matrix on the included testing aluminium flake maps the full 380-plus colour range achievable.
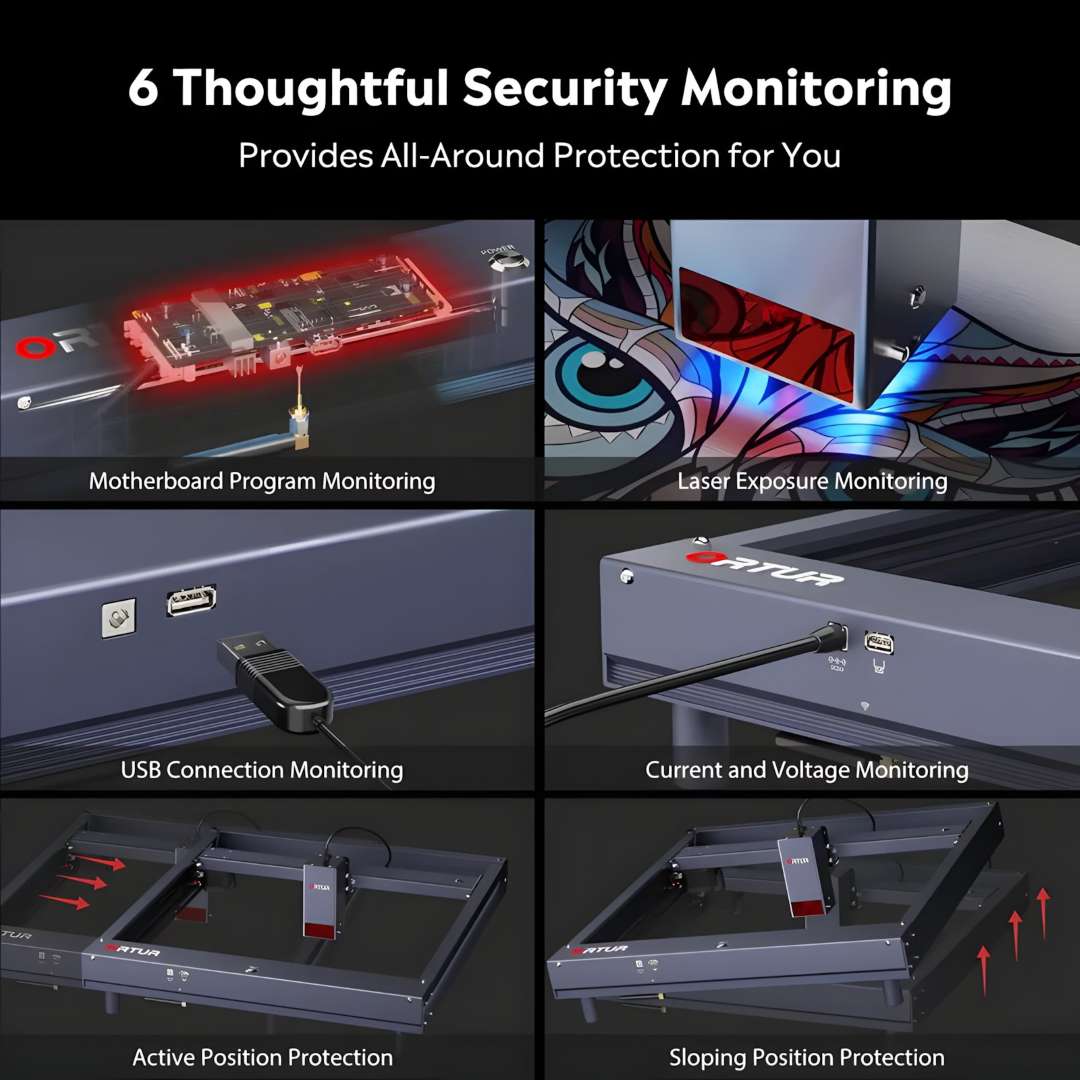
Safety Systems
The OLM-ESP-H10_V2.7 motherboard runs six concurrent monitoring routines that operate independently of the host software connection. Most ignition incidents on consumer laser engravers trace back to a frozen firmware state, a lost USB connection, or a tipped machine — all three of which the H10 detects and responds to automatically.
- Motherboard program monitoring — a watchdog timer detects firmware freeze and cuts laser power.
- USB connection monitoring — loss of host connection triggers immediate laser shutdown.
- Current and voltage monitoring — continuous supply-rail checks disable the laser on out-of-spec readings.
- Laser exposure monitoring — enforces a configurable maximum single-exposure duration.
- Active position protection — a G-shock / gyroscopic sensor detects unexpected movement and halts engraving.
- Sloping position protection — tilt beyond the safe operating angle stops laser output automatically.
The six-panel graphic below shows each monitoring system in context.
Certification & Compliance
The H10 holds FDA, CE, FCC, RoHS, and UKCA certification, covering the electrical, emissions, and material-safety standards relevant to a consumer diode laser platform sold across the EU and adjacent markets.
Applications
- Signage and small-batch branding: the 300 × 300 mm work area and 20,000 mm/min top speed cover engraved plaques and short production runs without repositioning material.
- Woodworking and furniture detailing: single-pass cuts through 15 mm pine and fine grayscale engraving suit decorative panels and personalized woodwork.
- Leathercraft and personalized goods: the compressed spot renders fine linework and text on leather and felt for one-off or small-batch personalization.
- Metal marking and industrial ID: 0.1 mm stainless steel scribing and colour-shift oxide marking support permanent part identification and decorative colour marking.
- Prototyping and model making: 30 mm acrylic cutting in a single pass covers structural components and display models.
- Photo engraving on acrylic and wood: 380-plus colour variations and 256 grayscale levels reproduce photographic detail on flat and cylindrical substrates alike.
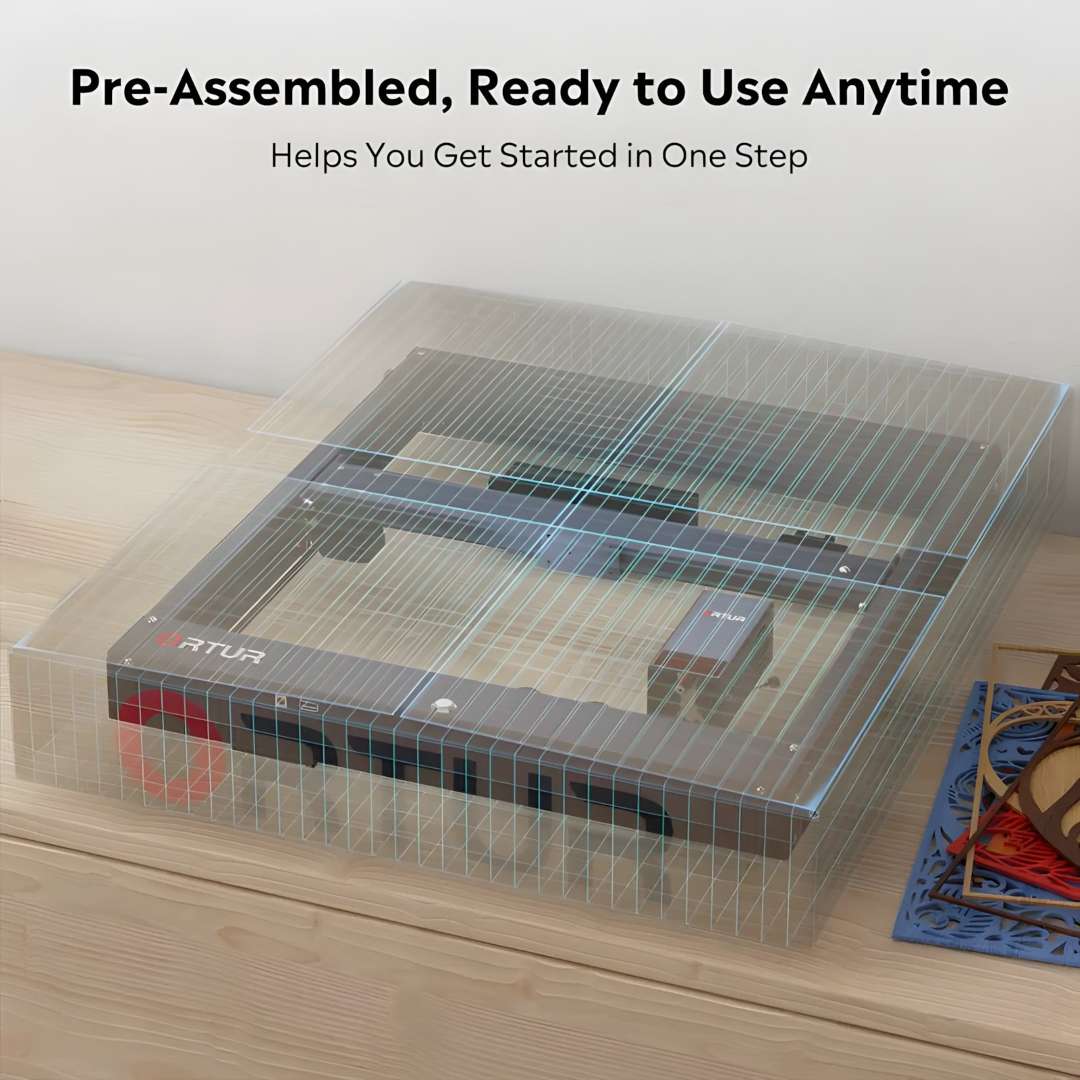
Because the frame, X-axis assembly, and laser module leave the factory pre-fitted under a protective cover, only the support feet and rail plate need attaching before the first job.
Compatibility of the Ortur Laser Master H10 20W
- Height risers: eight cylindrical aluminium risers thread directly into the standard foot sockets, raising the frame by up to 400 mm to clear tall or cylindrical workpieces.
- Laser module height: the adjustable limit switch on the left rail accommodates modules of different heights, allowing recalibration if the LU3-20B is later replaced with another Ortur module.
The full machine with all eight risers installed is a useful reference for bench clearance planning with cylindrical or oversized objects.
What's in the Box
The package contents shown below confirm every item included in the H10 20W kit, from the pre-assembled frame and laser module to the testing materials and safety goggles.
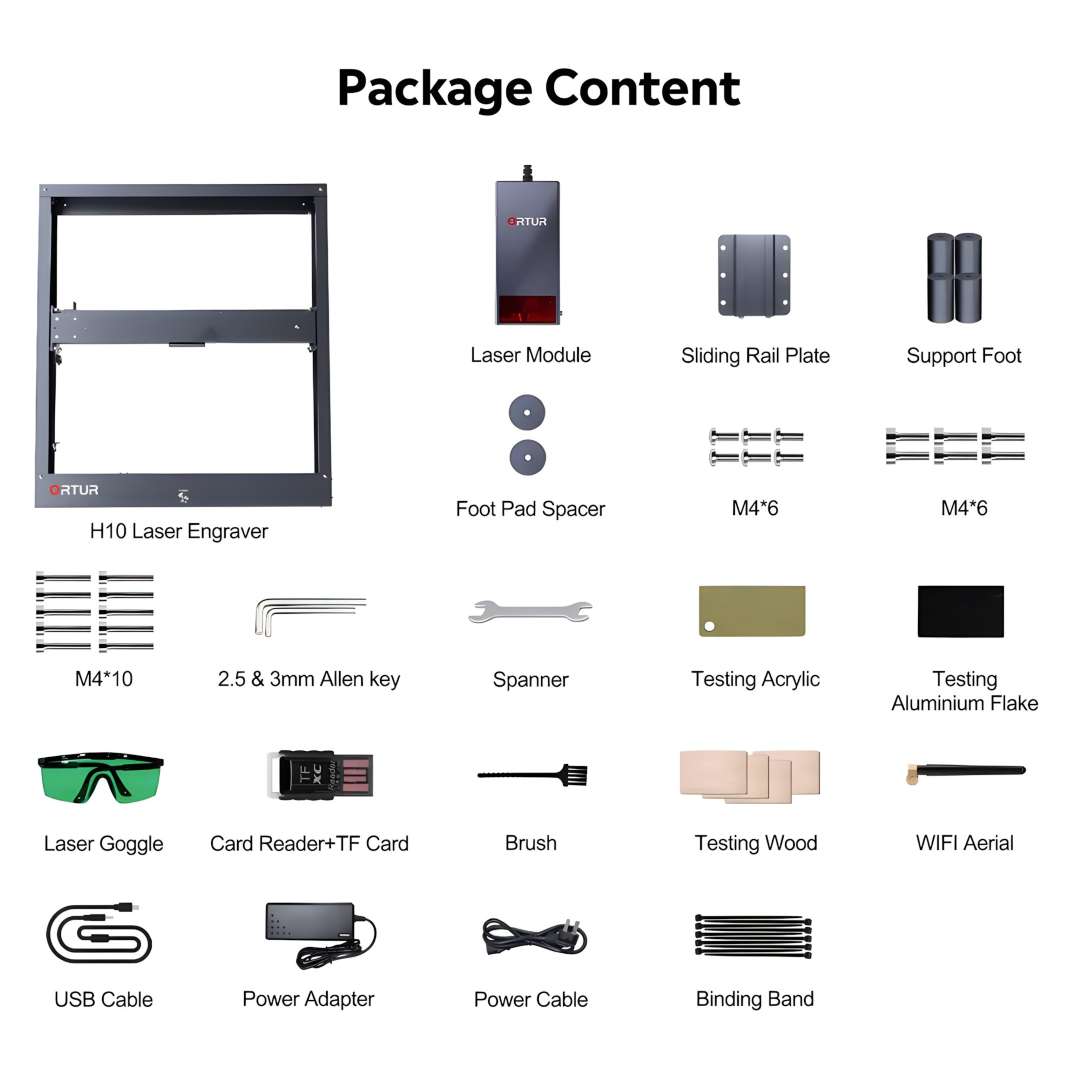
- Ortur Laser Master H10 frame (pre-assembled)
- LU3-20B 20 W laser module
- Sliding rail plate
- Support foot × 4
- Foot pad spacer
- M4×6 screws + M4×10 screws
- 2.5 mm and 3 mm Allen key
- Spanner
- Quick-focus stick
- Testing acrylic sheet
- Testing aluminium flake
- Testing wood piece
- Laser safety goggles
- Card reader + TF card
- Cleaning brush
- WiFi aerial
- USB cable
- 24 V / 6 A power adapter
- Power cable
- Binding bands
Technical specifications of the Ortur Laser Master H10 20W
Machine & Frame
| Parameter | Value |
|---|---|
| Product | Ortur Laser Master H10 |
| Motherboard | OLM-ESP-H10_V2.7 |
| Firmware | ESP_H10_218 |
| Frame Materials |
|
| Motors | NEMA17 Stepper Motors |
| Engraving Area | 300 × 300 mm |
Motion & Precision
| Parameter | Value |
|---|---|
| Mechanical Precision — Y axis | 12.5 µm |
| Mechanical Precision — X axis | 12.5 µm |
| Pixel Accuracy | Adjustable — Default: 300 DPI (~0.81 µm pixel accuracy) |
| Engraving Speed Range | 0–20,000 mm/min |
Laser Module (LU3-20B)
| Parameter | Value |
|---|---|
| Laser Module | LU3-20B |
| Optical Power Output | >20,000 mW |
| Wavelength | 445 ± 5 nm |
| Focus Type | Fixed Focus |
| Default Focal Length | 46 mm (from heat sink to object) |
| Dot Size | 0.1 × 0.12 mm |
| Modulation Mode | PWM |
| Power Rate | S0–S1000 |
| Module Weight | 235 g |
Connectivity & Control
| Parameter | Value |
|---|---|
| Control Modes |
|
| Baud Rate | 115,200–921,600 (Default: 115,200) |
| Compatible OS |
|
| Control Software |
|
| Supported Input Formats | JPG, JPEG, PNG, BMP, SVG, and others |
Power & Environment
| Parameter | Value |
|---|---|
| Input Voltage | 100–240 V ~ 50/60 Hz |
| Power Adapter Output | 24 V / 6 A |
| Operating Temperature | -5 °C – 50 °C |
Materials
| Parameter | Value |
|---|---|
| Engravable Materials |
|
| Cuttable Materials |
|
Safety & Certifications
| Parameter | Value |
|---|---|
| Safety Systems |
|
| Certifications |
|
How to Connect the Ortur Laser Master H10 to a Computer
This procedure covers TF card insertion, driver installation on older Windows versions, USB connection, and first homing — the steps required before sending a job from LaserGRBL or xTool Studio to the H10.
The official installation walkthrough below covers unboxing, rail-plate attachment, support foot fitting, and the first homing cycle.
Step 1: Insert the TF Card Before Powering On
Insert the TF card, gold contacts facing up, into the TF slot on the front panel before switching on the machine. The card must be present — the machine will not boot correctly without it in the slot.
Step 2: Power On and Allow Homing to Complete
Press and hold the main power button for more than 500 ms. The status LED fades from dark to white, then flashes white during initialisation. Wait for both X and Y axes to complete homing before connecting the USB cable to any host computer.
Step 3: Install the Espressif Driver (Windows 7 / 8 Only)
On Windows 7 or 8, download Zadig from zadig.akeo.ie. Open it with administrator privileges, select "List All Devices" from the Options menu, choose "Espressif CDC Device (Interface 0)", and click "Install Driver". Skip this step on Windows 10, macOS, and Linux.
Why buy the Ortur Laser Master H10 20W from EXPERT3D?
EXPERT3D supplies professional 3D printing and laser engraving equipment since 2012. Our team offers expert pre-sales consultation to match the H10 to your material and workflow, backed by an official warranty and authorized after-sales service. Delivery is available across the EU, and post-sale support with operator training is available on request. Financing options and a stocked inventory of consumables and spare parts — safety goggles, focus sticks, air assist tubing — keep the machine running without long waits for parts. As an official representative of Ortur, we guarantee 100% authenticity, fair pricing, authorized service, and an official warranty.
")
")


")


 Laser Engraver for Metal and Plastic Engraving")


")


