


- Stock: In Stock
- Product code: 50945123877097
- Weight Brutto: 11.00kg
The Ortur Laser Master H10 10W is a diode laser engraver built for makers, small businesses, and educators who demand both speed and precision — featuring a 300 mm × 300 mm working area, a 10 W LU2-10A optical module with a compressed focal spot of 0.05 × 0.1 mm, and a maximum engraving speed of 20,000 mm/min, all housed in a flat aluminium-alloy frame that ships pre-assembled and ready to engrave in minutes.
| Optical Power | >9500 mW (LU2-10A module) |
|---|---|
| Engraving Area | 300 mm × 300 mm |
| Maximum Engraving Speed | 20,000 mm/min |
| Mechanical Precision (X / Y) | 12.5 µm / 12.5 µm |
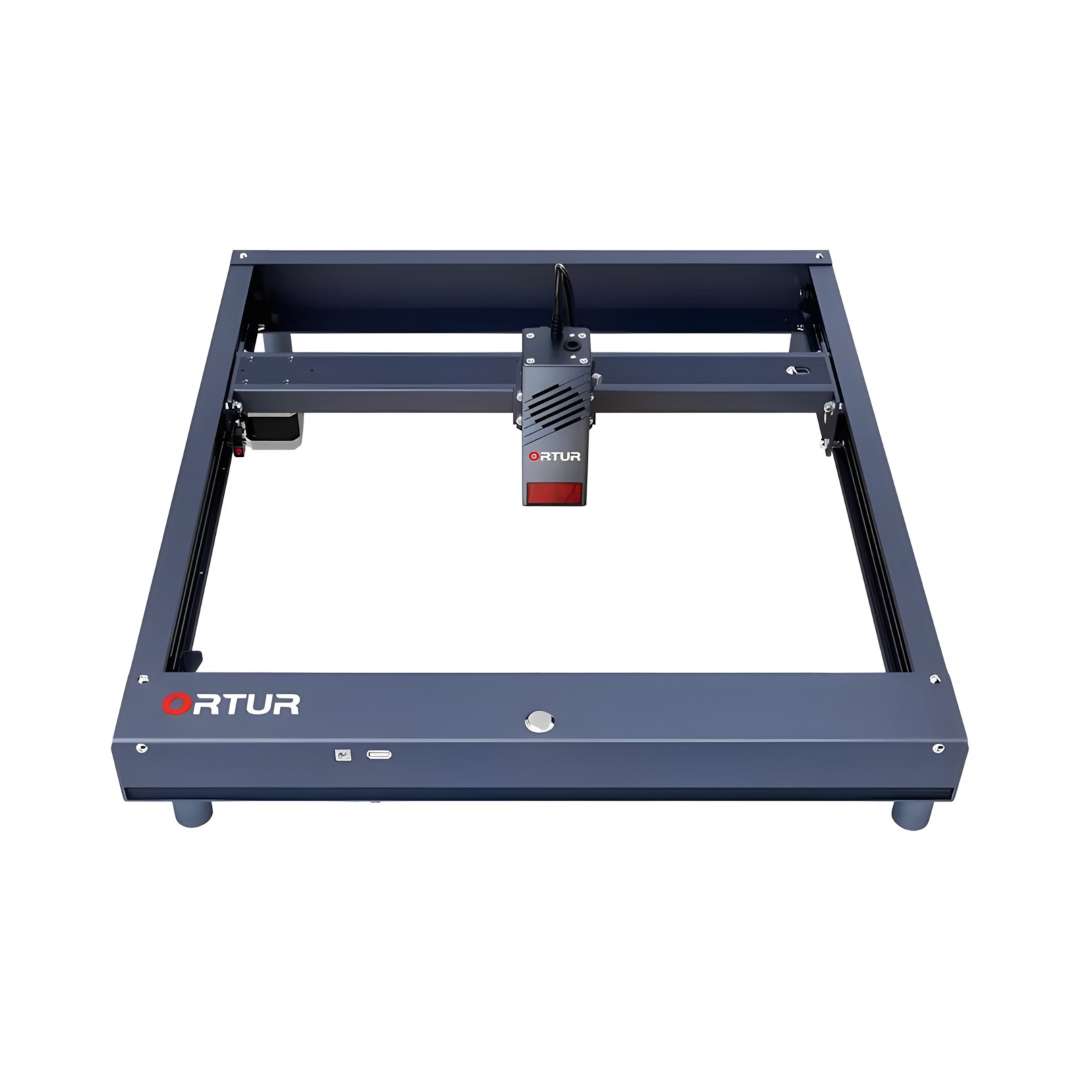
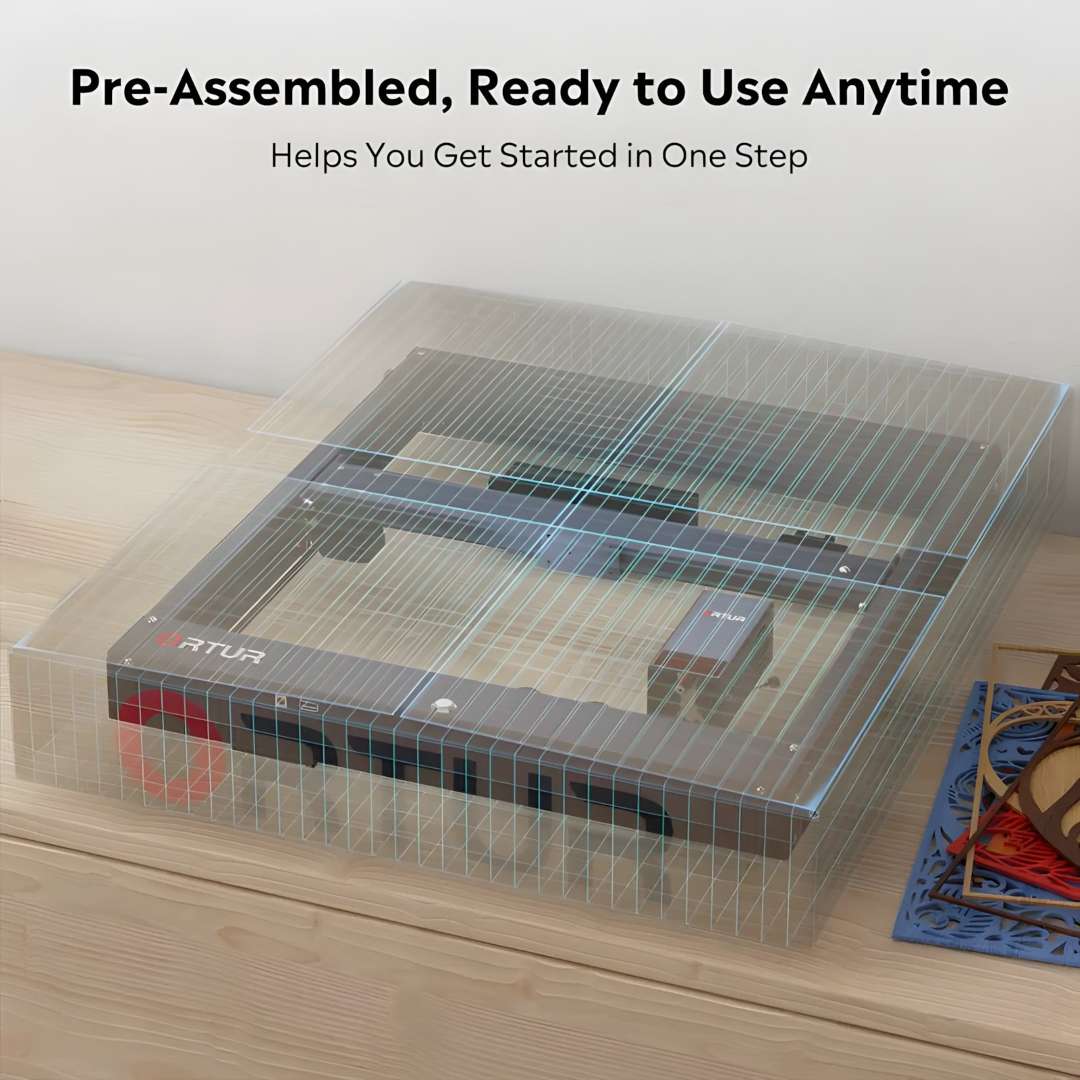
The image below shows the Ortur H10 in its clean production form — a flat, low-profile aluminium frame with the LU2-10A module centred on the gantry, front control panel, and stackable support legs visible.
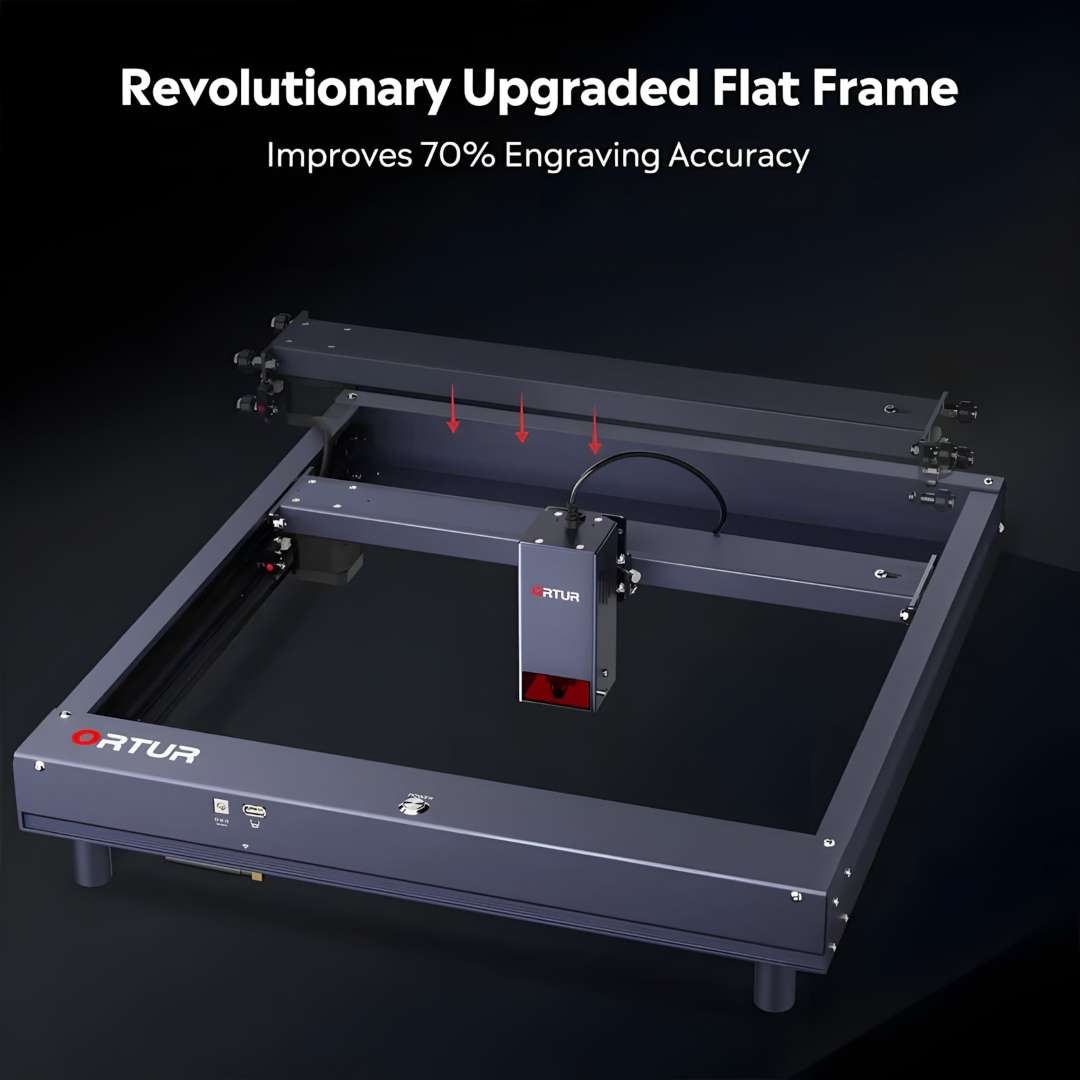
Flat Frame Architecture: 70 % Better XY Accuracy at High Speed
Most desktop diode engravers use a raised portal or cantilevered gantry, which introduces flex and vibration at high traverse speeds. The H10 adopts a fully flat, closed aluminium frame — the same structural concept used in professional CNC routers. Because the centre of gravity sits very close to the work surface, resonance is damped before it can shift the laser spot. The result is measurably better XY plane resolution when the head is travelling near its peak of 20,000 mm/min.
The diagram below illustrates the upgraded flat-frame design with the X-axis rail pressing flush against the frame perimeter, eliminating the gap that causes positional drift in conventional open-frame machines.
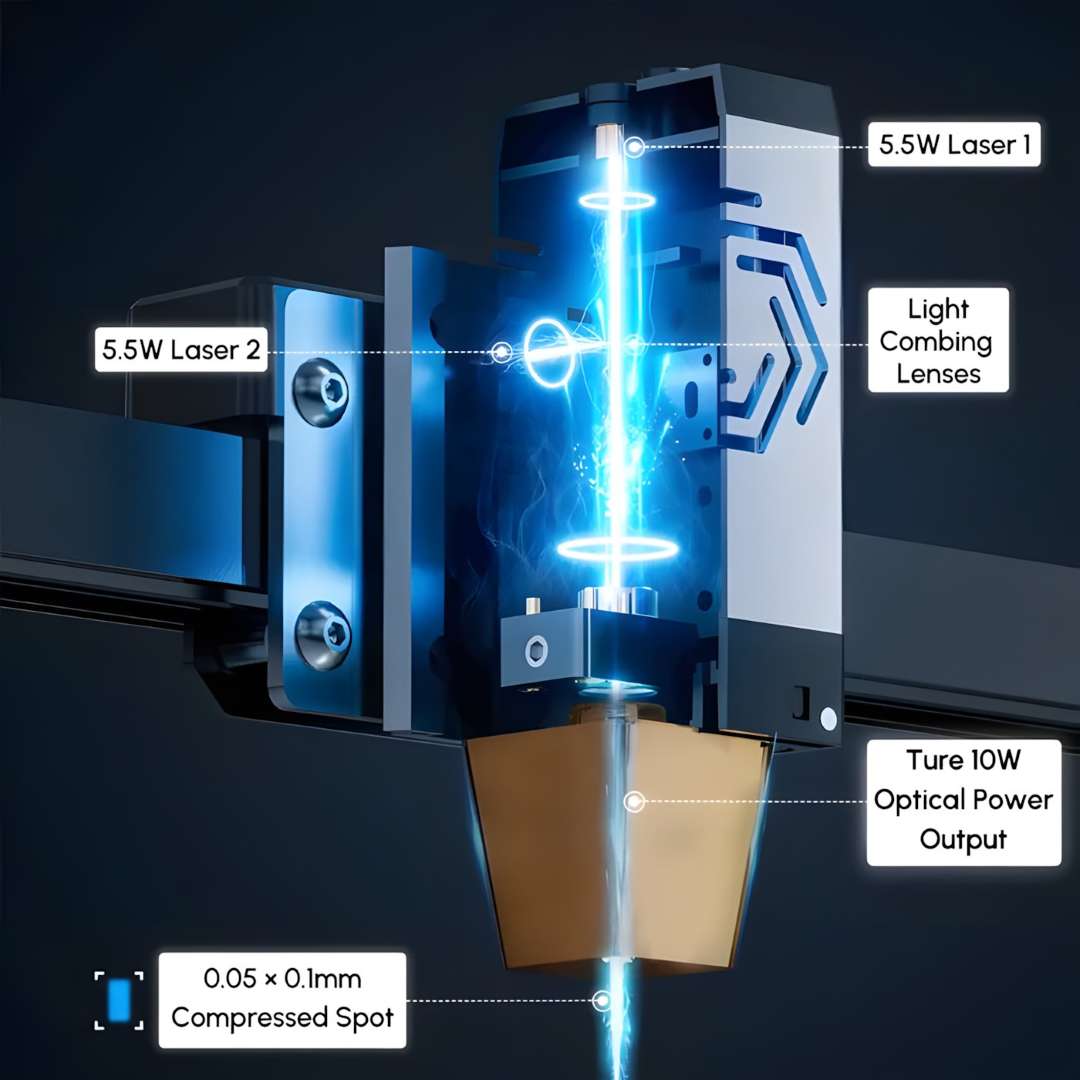
LU2-10A Laser Module: 4th-Generation Beam-Combining Technology
The LU2-10A module pairs two independent 5.5 W diode sources and combines them through proprietary light-combing lenses, producing a single output beam with an optical power exceeding 9500 mW at a wavelength of 445 ± 5 nm. The dual-compression diode geometry squeezes the focal spot down to 0.05 × 0.1 mm — roughly half the size of a typical single-diode module. Smaller spot = finer engraved lines = details that survive magnification without aliasing.
The cutaway below reveals the internal beam path: the two 5.5 W sources on opposite sides feed into the combing lens assembly, converging to the 0.05 × 0.1 mm compressed spot at the nozzle exit where the true 10 W optical power output is delivered.
Cutting Capability
With the built-in air-assist interface connected to a 40 L/min air pump, the H10 delivers clean single-pass cuts through a wide range of materials. Burn marks are reduced by approximately 50 % because the airflow clears combustion gases from the kerf before they can re-deposit as char.
- 12 mm wood in one pass
- 5 mm black acrylic in one pass
- Pine board up to 20 mm maximum cutting thickness
- Acrylic sheet up to 30 mm maximum cutting thickness
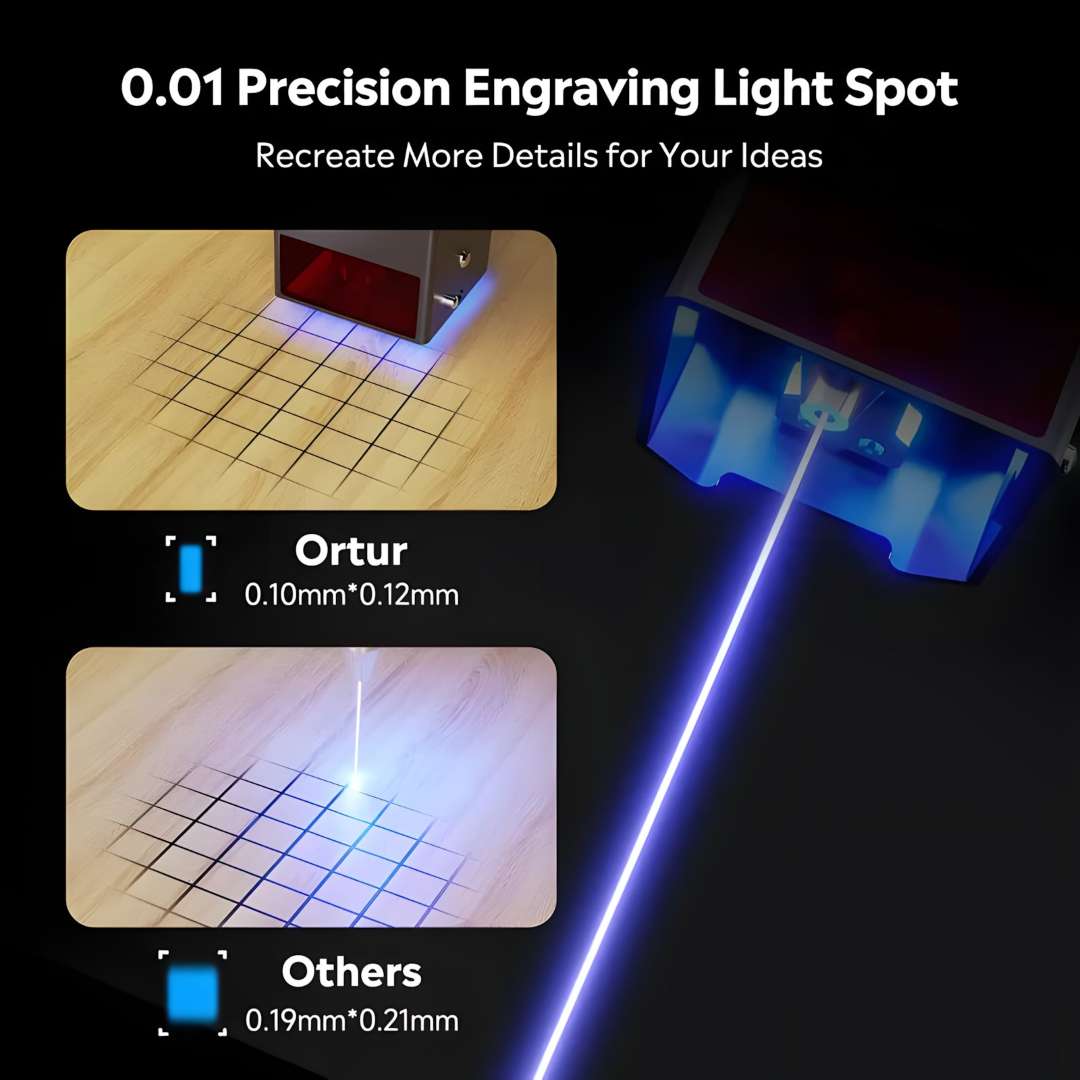
0.01 mm Precision: Spot Size Comparison
The comparison below places the H10's focal spot (0.10 × 0.12 mm at the work surface, driven by the 0.05 × 0.1 mm compressed core) next to a typical competitor spot of 0.19 × 0.21 mm. At 0.01 mm step resolution the difference is clearly visible in fine portrait work and text below 5 mm character height.
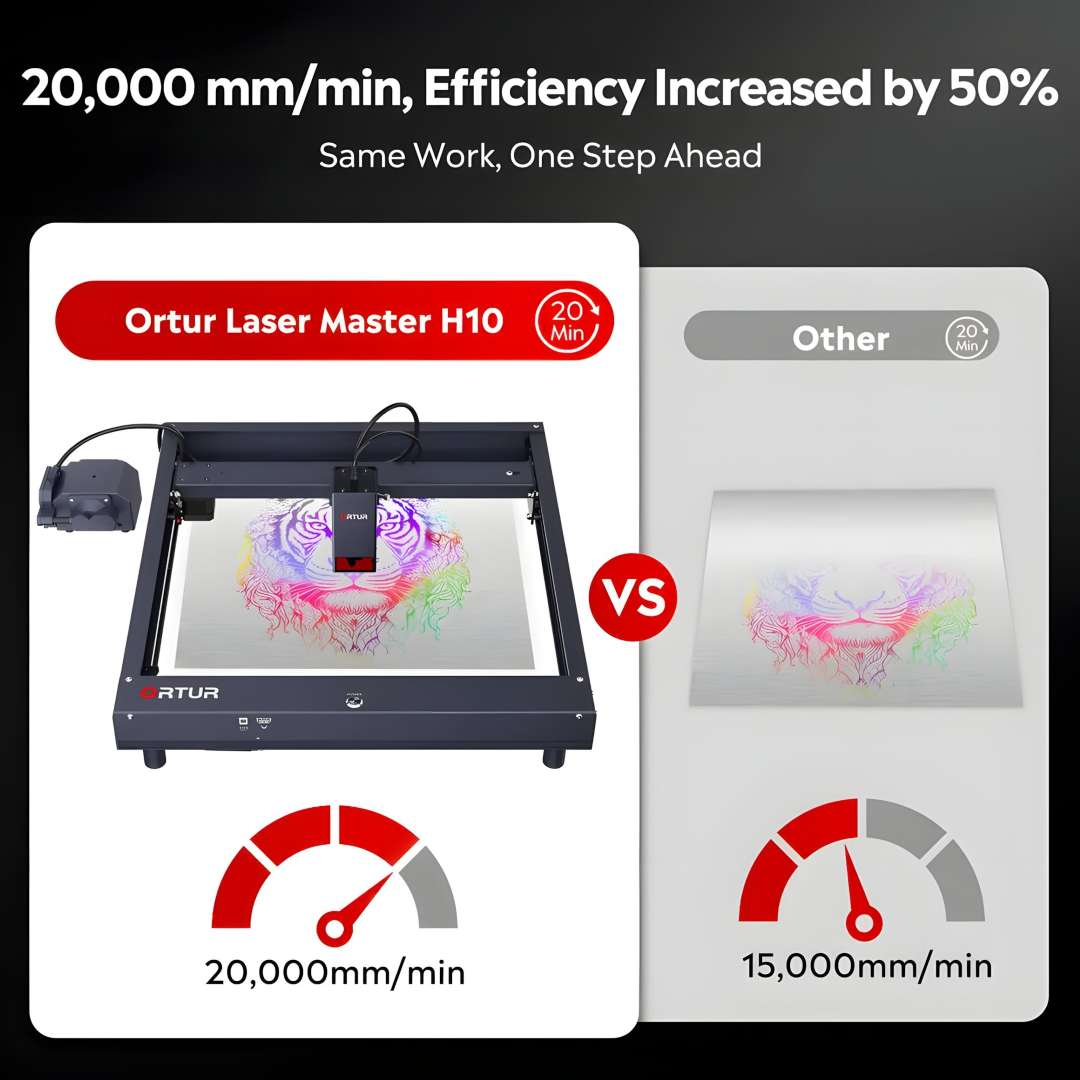
20,000 mm/min: Where Speed Meets Throughput
At its peak traverse rate the H10 completes the same engraving job 50 % faster than machines capped at 15,000 mm/min — in a controlled 20-minute benchmark, the H10 finishes the full design while a 15,000 mm/min machine has only completed two thirds of it. This is not a theoretical maximum hidden behind conservative firmware defaults; the 20,000 mm/min figure is achievable in xTool Studio and LaserGRBL with standard fill layer settings.
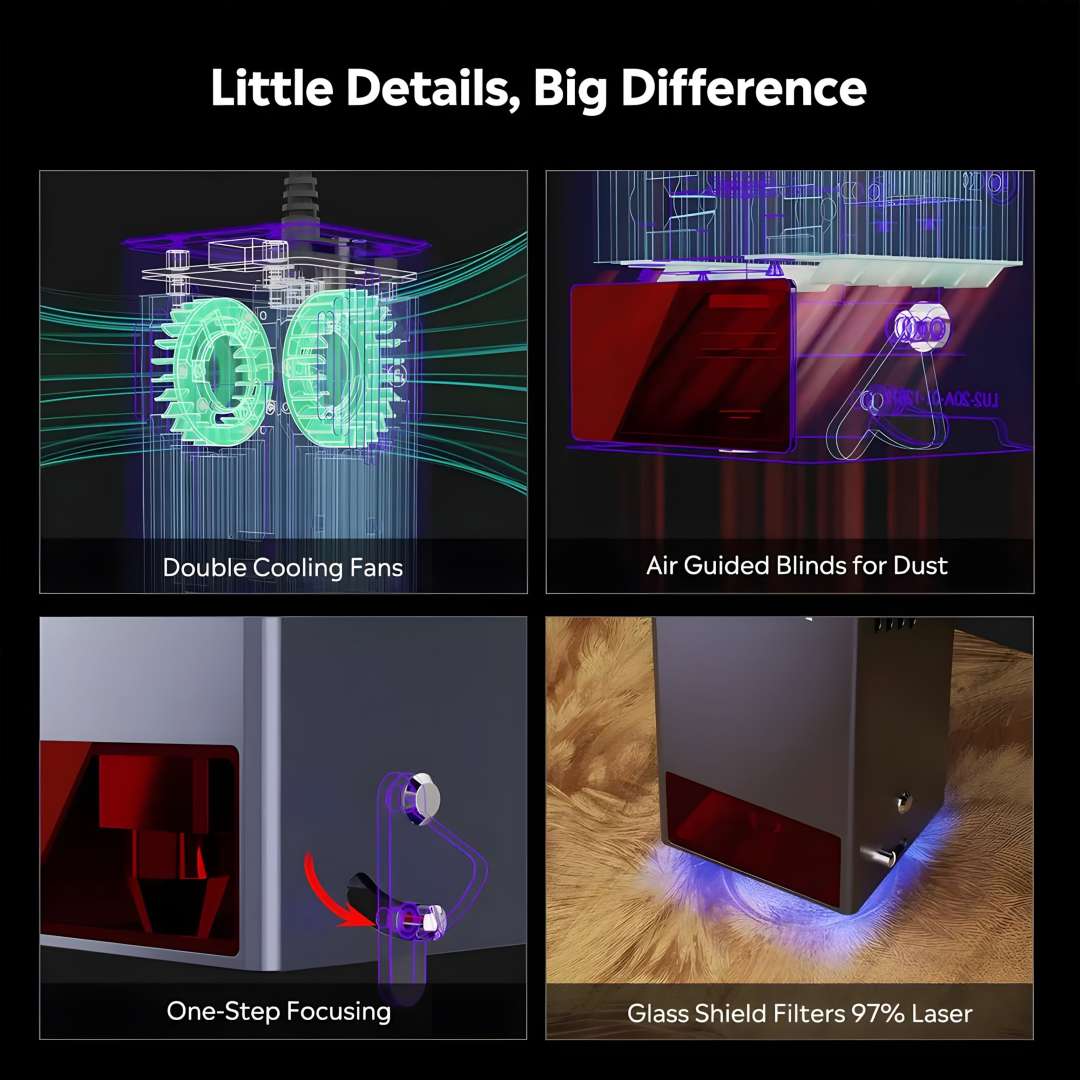
Module Engineering: Little Details That Matter
Four hardware refinements distinguish the H10's module from first-generation diode designs. The panel below illustrates each one: dual 10,000 rpm cooling fans rated for 10,000 hours of service life; air-guided blinds that channel airflow through the module to self-clean internal optics; a quick-focus stick for single-step focal distance setting; and a glass laser shield that filters 97 % of stray laser light so the operator can monitor the engraving area without wearing full goggles during observation pauses.
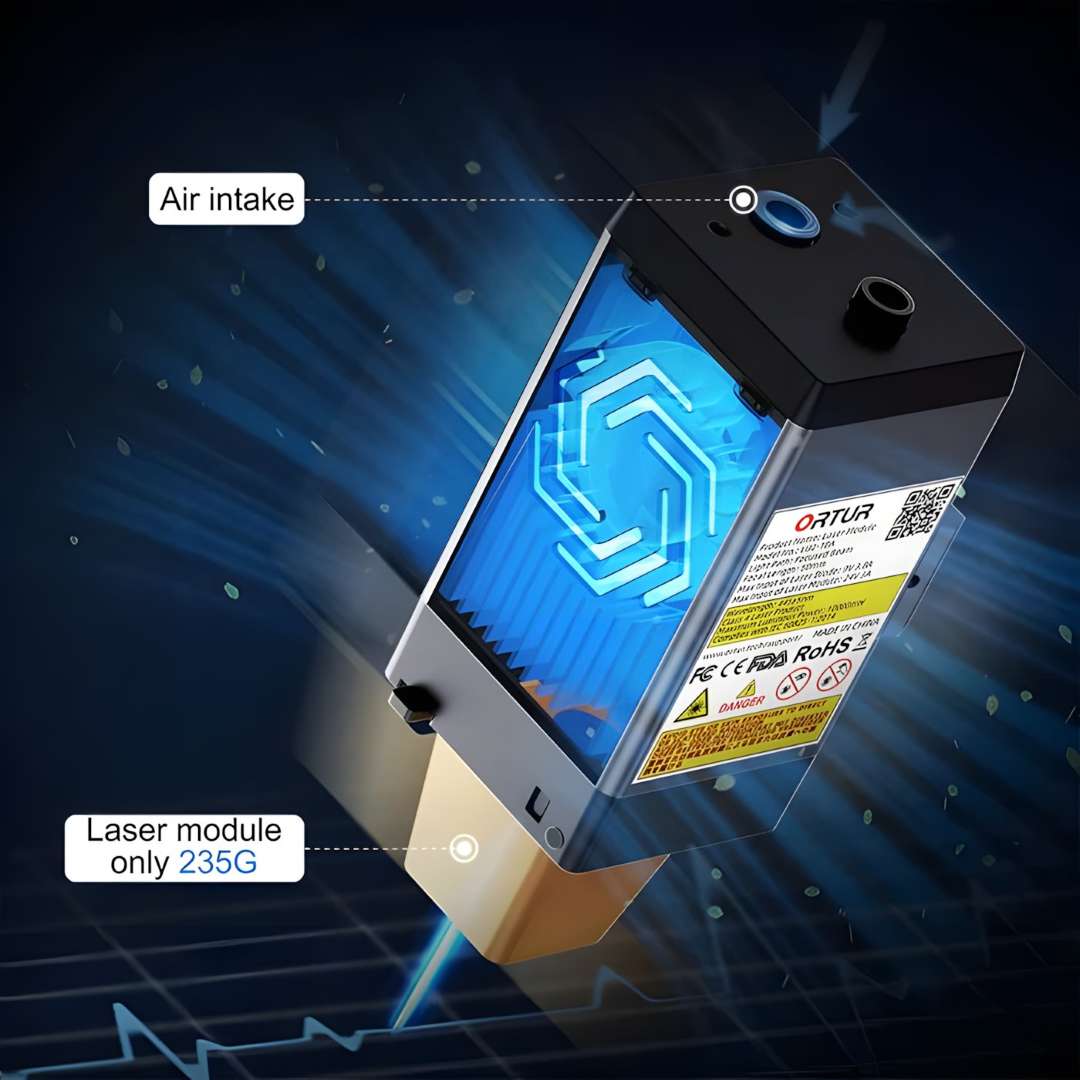
Lightweight Module: Only 235 g
Despite housing two laser sources, dual fans, and a built-in air-assist port, the LU2-10A tips the scale at just 235 g. Lower carriage mass directly translates to lower inertial forces during direction reversals — which is exactly why 20,000 mm/min is achievable without ringing artifacts at corners.
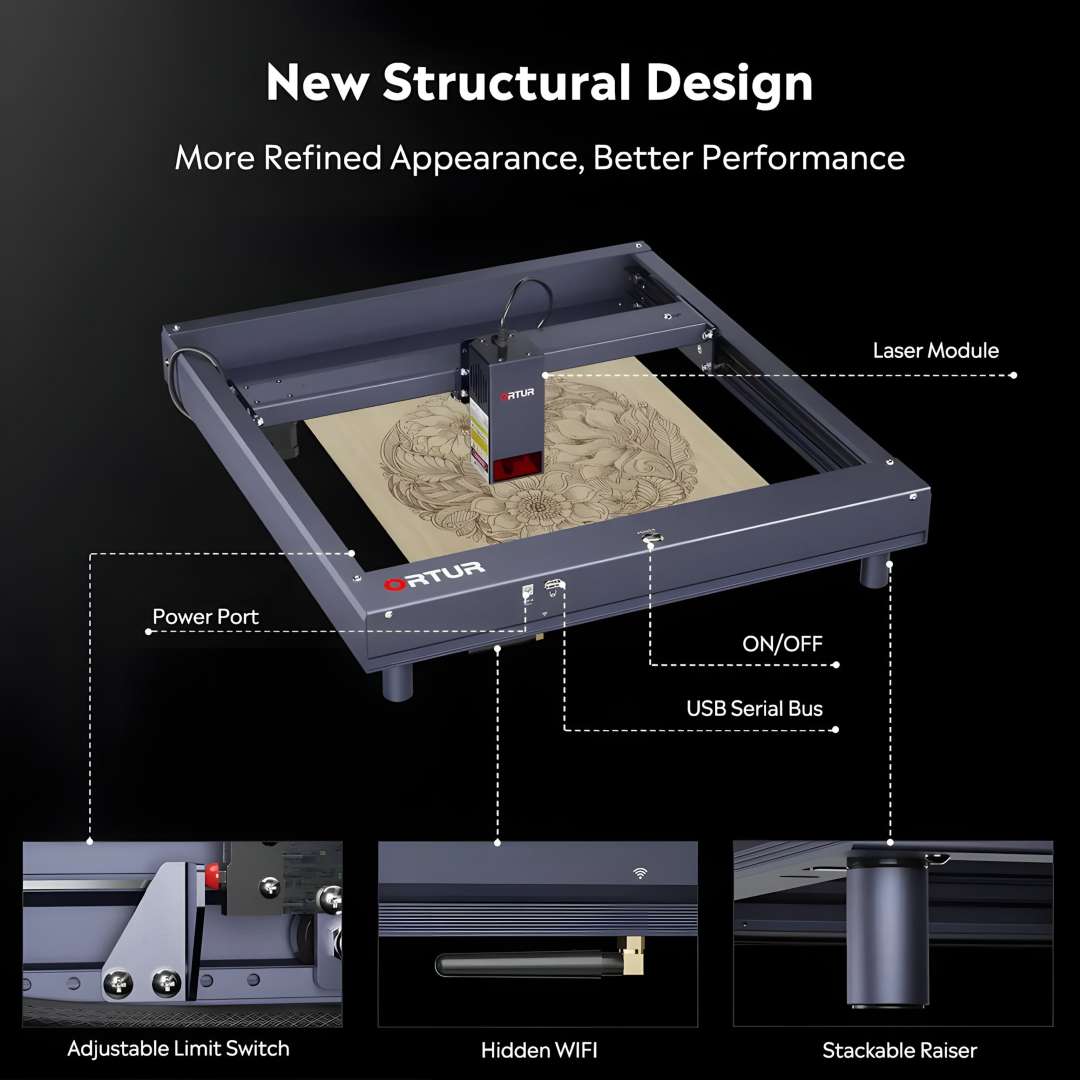
New Structural Design: Interfaces and Adjustability
The H10's control panel is consolidated on the front face of the frame: a dedicated power port on the left, a USB serial bus and ON/OFF button in the centre, a TF card slot, and a hidden WiFi antenna port. Three further hardware features are visible on the machine: an adjustable limit switch that repositions to accommodate different laser module heights (handy for users upgrading the module later), a compact hidden-slot WiFi antenna, and stackable cylindrical raisers that can elevate the work area for thicker material without any frame modification.
Six Safety Monitoring Systems
Laser engravers present genuine fire and eye-injury risk when left unattended or operated incorrectly. The H10 addresses this with a layered hardware-and-firmware monitoring stack. Each of the six systems below operates independently so a single failure cannot defeat the others.

- Motherboard program monitoring — watchdog timer halts laser on firmware freeze
- USB connection monitoring — job pauses automatically on cable disconnect
- Current and voltage monitoring — shuts down on abnormal power-rail readings
- Laser exposure monitoring — enforces maximum continuous exposure time limits
- Active position protection (G-shock / gyroscopic sensor) — cuts power if the machine is moved while firing
- Sloping position protection — prevents firing if the frame is tilted beyond a safe angle
Software Ecosystem: From Beginner to Professional
The H10 connects via USB, WiFi (2.4 GHz), SD card, FTP, and web UI — meaning it can run standalone from a TF card job without any computer attached. xTool StudioOrtur mobile app on a smartphone simultaneously, illustrating the multi-device flexibility built into the platform.

- Ortur App (free, iOS/Android) — self-developed mobile app covering novice and experienced users
- LaserGRBL (free, Windows) — lightweight GRBL sender, ideal for quick jobs and basic image engraving
- xTool Studio (paid, Windows / Mac / Linux) — full-featured professional software with layer control, camera alignment, and advanced vectorisation
The H10 arrives pre-assembled. Unbox, attach the four support feet, connect the laser module cable, insert the TF card, and plug in power — you can be engraving within minutes.
Technical Specifications of the Ortur Laser Master H10 10W
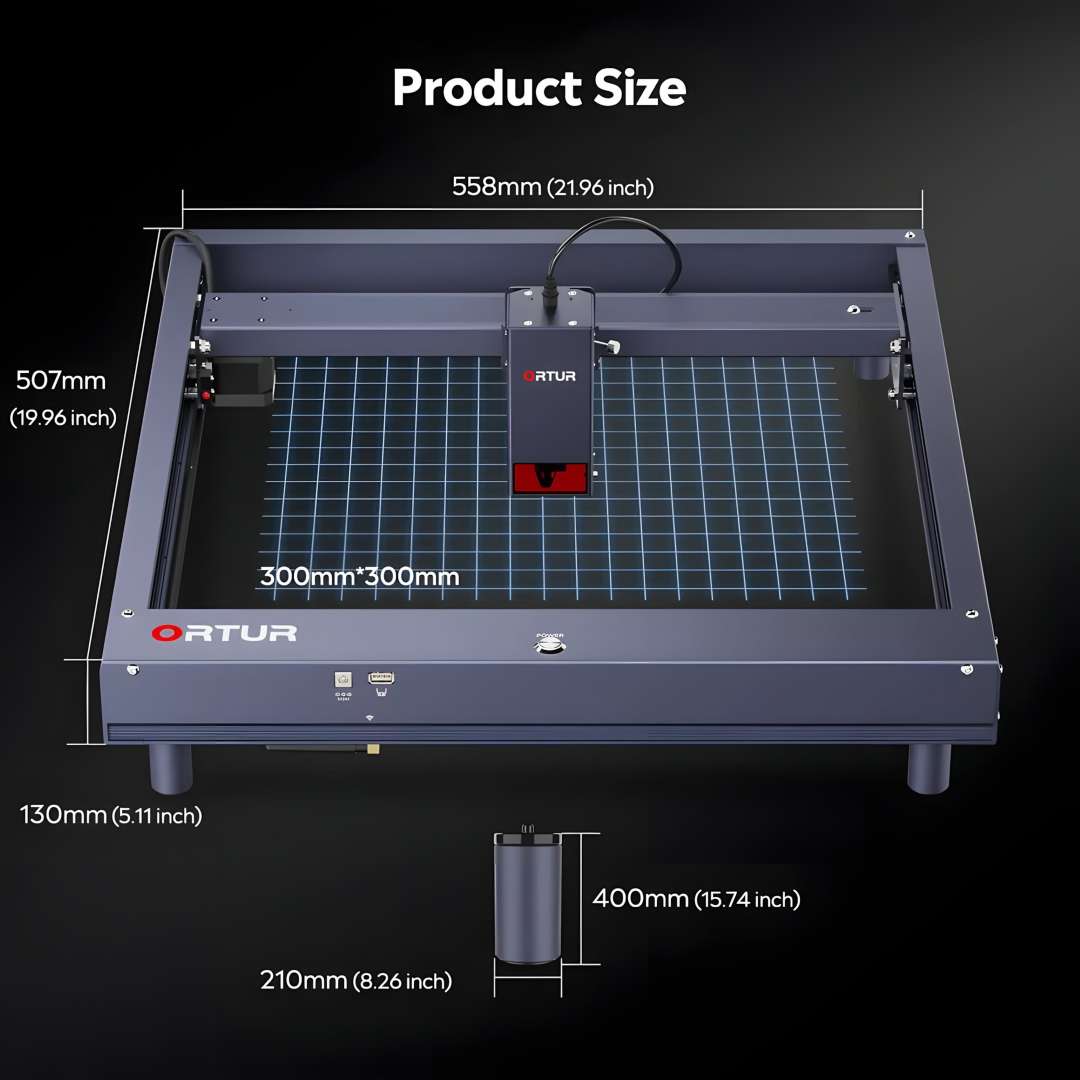
The annotated product size diagram below confirms the overall machine footprint and the 300 mm × 300 mm engraving area before the full numerical specification tables.
Machine Identity
| Product | Ortur Laser Master H10 |
|---|---|
| Motherboard | OLM-ESP-H10_V2.7 |
| Firmware | ESP_H10_218 |
Frame & Mechanical
| Frame Materials | 70% Aluminium, 15% Stainless Steel, 5% Plastic, 5% Brass, 5% Others |
|---|---|
| Motors | NEMA17 Stepper Motors |
| Mechanical Precision (Y / X) | 12.5 µm / 12.5 µm |
| Pixel Accuracy | Adjustable (default 300 DPI — approx. 0.81 µm pixel accuracy) |
| Engraving Area | 300 mm × 300 mm |
Laser Module (LU2-10A)
| Laser Module | LU2-10A |
|---|---|
| Optical Power | >9500 mW |
| Wavelength | 445 ± 5 nm |
| Focus Type | Fixed Focus |
| Default Focal Length | 46 mm (heat sink to object surface) |
| Compressed Focal Spot | 0.05 × 0.1 mm |
Motion & Control
| Control Mode | PWM |
|---|---|
| Power Rate | S0–S1000 |
| Maximum Engraving Speed | 20,000 mm/min |
| Baud Rate | 115200 – 921600 (default: 115200) |
Connectivity & Software
| Connectivity | 2.4 GHz WiFi, USB, SD Card, FTP, Web UI |
|---|---|
| Compatible OS | Windows XP/7/8/10 (LaserGRBL); macOS, Linux (xTool Studio) |
| Control Software | LaserGRBL (free), xTool Studio (paid), Ortur App (free) |
| Supported Input Formats | JPG, JPEG, PNG, BMP, SVG and others |
Compatible Materials
| Engravable Materials | Wood board, paperboard, black acrylic, leather, food surfaces, stainless steel, powder-coated metal |
|---|---|
| Cuttable Materials | Wood board, paperboard, black acrylic, leather, felt cloth, dark-colour plastic sheet |
Power Supply
| Input Voltage | 100–240 V ~ 50/60 Hz |
|---|---|
| Power Adapter Output | 24 V / 6 A |
| Operating Temperature | -5 °C – 50 °C |
Safety Features
| Safety Systems | Active position protection, exposure duration detection and limitation, laser beam safety guard, sloping position protection, host computer watchdog, WiFi / FTP / SD card reader |
|---|---|
| Certifications | FDA, CE, FCC, RoHS, UKCA |
What's in the Box
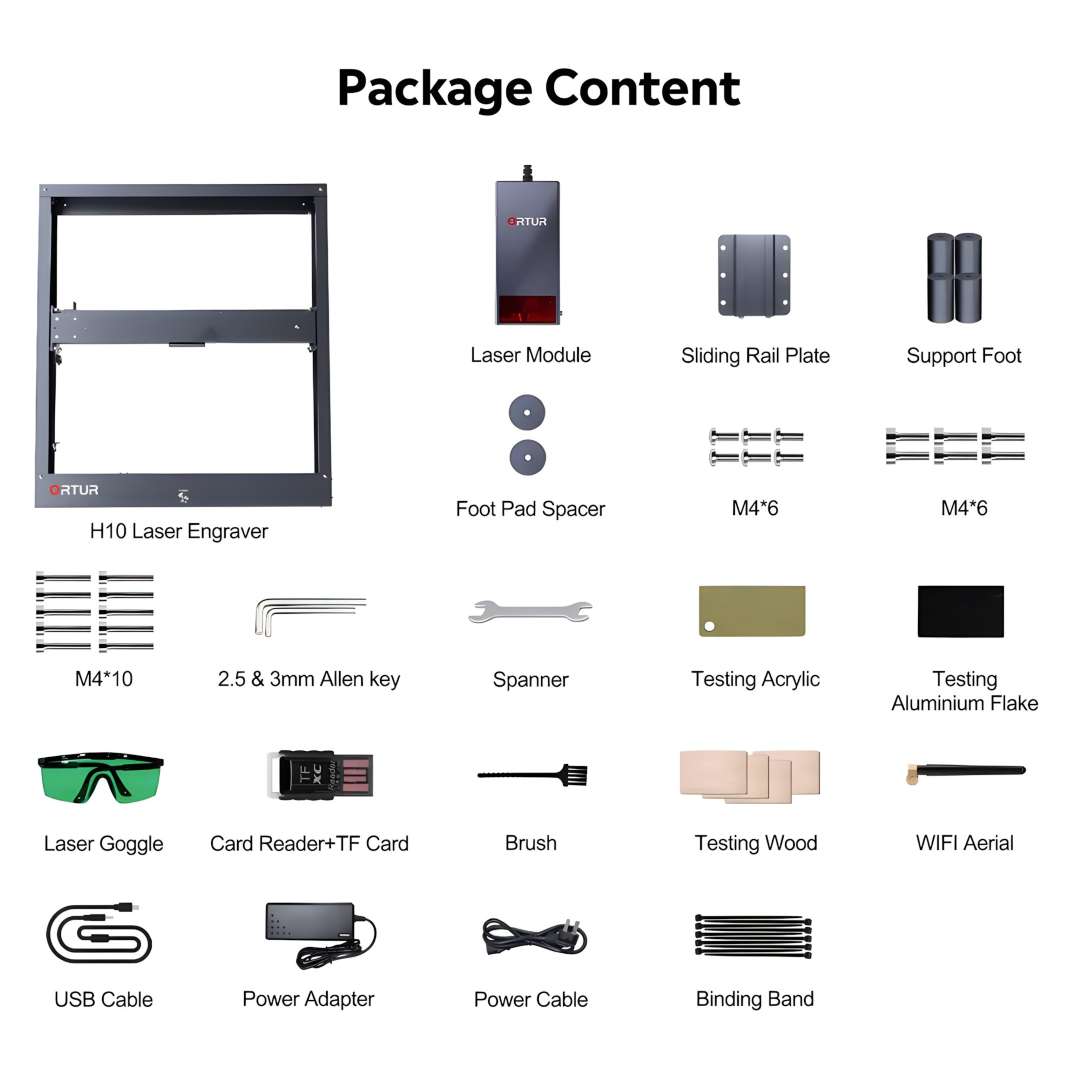
- H10 laser engraver (pre-assembled frame)
- LU2-10A 10 W laser module
- Sliding rail plate
- Support foot × 4
- Foot pad spacers
- M4 × 6 screws
- M4 × 10 screws
- 2.5 mm & 3 mm Allen keys
- Spanner
- Testing acrylic sheet
- Testing aluminium flake
- Testing wood piece
- Laser safety goggles
- Card reader + TF card
- Brush
- WiFi aerial
- USB cable
- Power adapter (24 V / 6 A)
- Power cable
- Binding band
How to Connect the Ortur H10 to xTool Studio on macOS
This procedure covers the correct USB connection sequence for macOS, which requires a specific boot order to enumerate the H10's serial port correctly in xTool Studio.
Step 1: Power on the H10 first
Press and hold the main power button until the LED transitions through its white fade-up sequence and the machine homes. Allow the homing cycle to complete fully before proceeding.
Step 2: Connect the USB cable
Plug the USB cable into the H10's USB serial bus port on the front panel and into your Mac. macOS enumerates the serial device only after the machine is fully powered and has completed its homing sequence — plugging in before power-on often results in a missing port.
Step 3: Select the correct port in xTool Studio
Launch xTool Studio. In the Laser panel, open the device drop-down and look for cu.usbmodemxxxxxx. Select it. You should see a welcome message in the xTool Studio console confirming the GRBL controller is responsive.
Step 4: Set focal distance using the quick-focus stick
Place the supplied quick-focus stick on the material surface directly below the module. Loosen the module height clamp, lower the module until the nozzle just rests on top of the focus stick, then tighten the clamp. The default focal length is 46 mm from the heat sink underside to the material surface.
Step 5: Run a framing pass before engraving
In xTool Studio, press Frame to trace the job boundary at low power with the laser off. Confirm the traced rectangle fits within the material. Enable air assist if cutting, then press Start.
What materials can the Ortur H10 10W engrave and cut?
The H10 engraves wood, paperboard, black acrylic, leather, food surfaces, stainless steel, and powder-coated metal. For cutting, it handles wood board, paperboard, black acrylic, leather, felt cloth, and dark-colour plastic. With the built-in air-assist interface active, it cuts 12 mm wood and 5 mm black acrylic in a single pass.
Does the H10 work without a computer connected?
Yes. The H10 can run jobs stored on the included TF card without any USB or WiFi connection to a host computer. It also supports FTP file transfer and a built-in web UI for wireless job management from a browser on the same network.
What is the engraving precision of the Ortur H10?
The H10 achieves 12.5 µm mechanical step precision on both X and Y axes. The LU2-10A module's compressed focal spot measures 0.05 × 0.1 mm, and with default 300 DPI settings the pixel accuracy is approximately 0.81 µm. The flat frame reduces positional drift at high speeds, improving overall XY plane resolution by approximately 70 % compared to conventional open-frame designs.
Is xTool Studio included with the H10?
No. xTool Studio is a paid third-party application available at LightBurnSoftware.com and supports Windows, macOS, and Linux. The free LaserGRBL application (Windows) and the free Ortur App (iOS/Android) are available at no additional cost and are sufficient for most engraving and basic cutting tasks.
What safety systems does the Ortur H10 include?
The H10 includes six independent safety layers: motherboard program monitoring with a watchdog timer, USB connection monitoring that pauses the job on disconnect, current and voltage monitoring, laser exposure duration limitation, active position protection using a G-shock and gyroscopic sensor that cuts power if the machine is moved during operation, and sloping position protection that prevents firing on an inclined surface.
How to Install the Ortur Laser Master H10
Official assembly tutorial covering rail plate installation, support-foot mounting, and belt tension adjustment for the H10 laser engraver.
The video below is the official Ortur installation guide for the H10.
Step 1: Attach the sliding rail plate
Fasten the sliding rail plate to the X-axis assembly using the supplied M4 × 6 screws. Ensure the plate sits flush and all screws are snug before proceeding.
Step 2: Install the front support feet
Attach the front two support stands to the frame corners using M4 × 10 screws and foot pad spacers. The spacers set the correct height clearance between the frame underside and the work surface.
Step 3: Install the rear support feet
Secure the rear support stands to the remaining two corners using M4 × 6 screws. Check that all four feet rest evenly on the work surface and the frame does not rock.


")
")
")


 Laser Engraver for Metal and Plastic Engraving")


")


