
- Stock: In Stock
- Product code: 00-08800061
- Weight Brutto: 1.50kg
- SKU: EF-FS1-01
The Fuse Series Replacement Air Exhaust Filter is an OEM maintenance consumable designed to sustain print enclosure air quality on the Fuse 1 and Fuse 1+ 30W SLS printers. After 2400 hours of cumulative printing, the exhaust filter becomes too clogged to clean effectively and must be replaced — keeping the internal atmosphere free of sintering by-products that degrade laser optics, sensor accuracy, and part surface quality.
| Replacement Interval | Every 2400 hours of printing |
|---|---|
| Cleaning Interval | Every 30 hours or after every 1–2 full build volume prints |
| Exhaust Line Purge Interval | After 900–1000 hours or 20 full build volume prints |
| Compatible Printers | Fuse 1, Fuse 1+ 30W |
Why the Exhaust Filter Is Critical for SLS Print Quality
SLS sintering releases fine powder particles, combustion gases, and thermal by-products into the print enclosure. The exhaust filter is the last barrier between those contaminants and the surrounding environment — and between a stable sintering atmosphere and one that compromises part integrity. A clogged exhaust filter reduces airflow through the enclosure, which raises ambient temperature inconsistencies that directly translate into dimensional inaccuracy and surface defects in finished parts.
Unlike intake filters that can be cleaned multiple times, the exhaust filter accumulates particulates that embed too deeply for vacuuming alone to remove after extended use. Replacing it at the 2400-hour mark is not a conservative recommendation — it is the manufacturer-specified threshold beyond which filter performance degrades below functional tolerance.
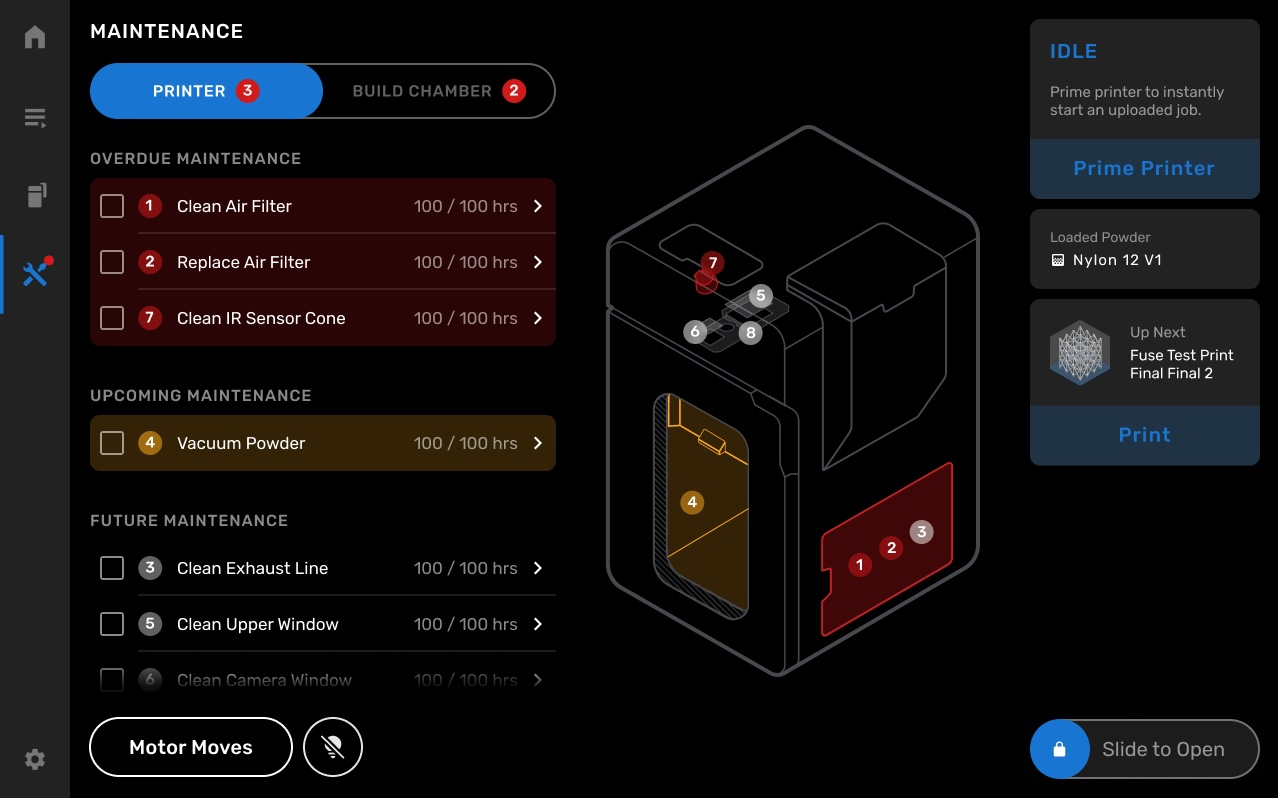
The Fuse 1's touchscreen tracks all filter maintenance milestones automatically. The image below shows the Maintenance screen, which displays overdue and upcoming tasks including air filter cleaning and replacement — organized by urgency and print hour intervals.
Filter Cabinet Access and Air System Safety
The exhaust filter is housed in a dedicated cabinet on the right side of the Fuse 1. Accessing it is straightforward — but there is one non-negotiable safety step: the air system must be turned off before opening the cabinet door. The exhaust fan shuts down automatically when the door is opened, preventing powder draw during the swap.
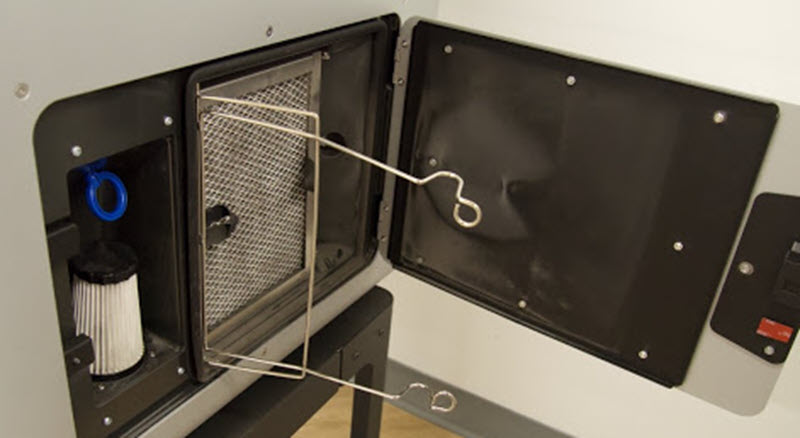
The image below shows the filter cabinet door fully open, exposing the exhaust filter housing with the wire retainer frame and the separate intake filter (the cylindrical unit on the left) visible alongside it.

Maintenance Tracking and Cleaning Cadence
The Fuse 1 printer tracks filter lifetime and cleaning history internally. Using the touchscreen prompts during every maintenance event is strongly recommended — the system logs each action and recalculates the next cleaning interval accordingly. Two distinct maintenance events apply to the exhaust filter:
- Routine cleaning: vacuum the filter grate every 30 hours of printing, or after every 1–2 full build volume prints, whichever comes first
- Exhaust line purge: clear blockages from the exhaust lines every 900–1000 hours or after 20 full build volume prints to maintain optimal airflow
- Full replacement: swap the filter at 2400 hours cumulative print time using this OEM replacement unit
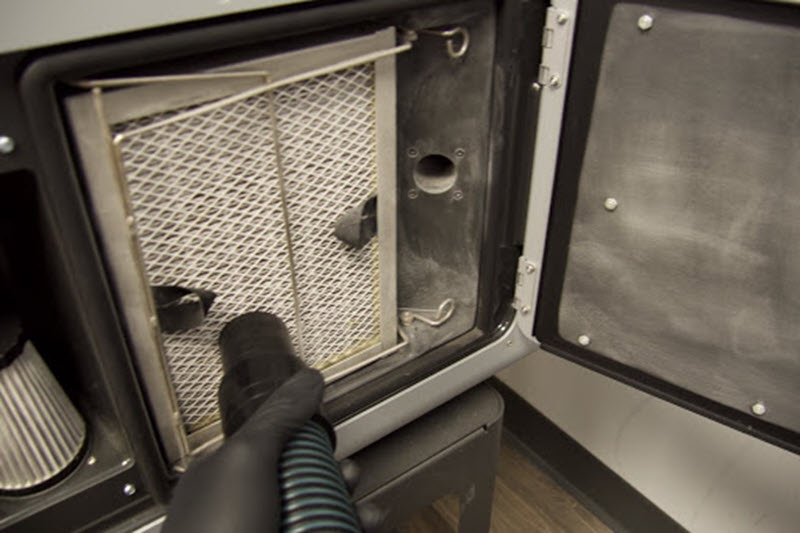
Before beginning the replacement, vacuum the filter grate to remove surface powder. Place the vacuum hose from the Fuse Sift directly against the mesh and move it slowly from top to bottom until the grate is clear. The image below shows this vacuuming step in progress.
Retainer Removal and Filter Extraction
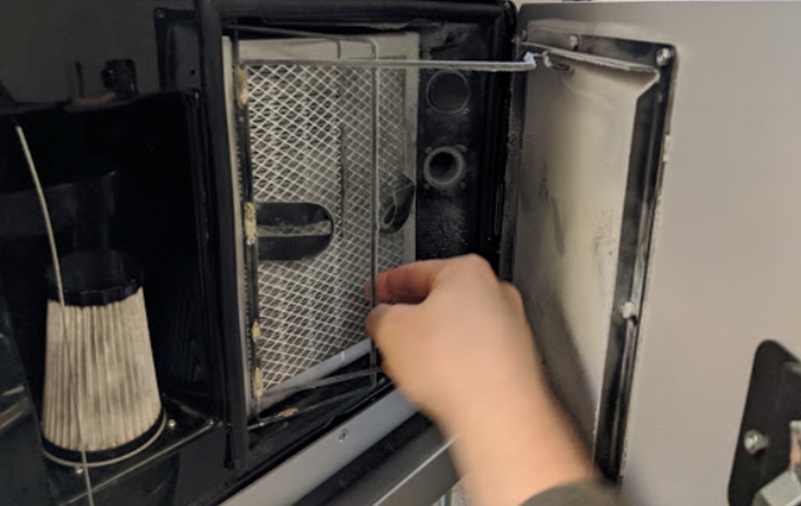
Once the grate is clean, release the wire retainer by depressing the hook at the top of the exhaust filter first, then the hook at the bottom — disengaging both from their retention pins. The image below shows the bottom hook being unclipped during this step.
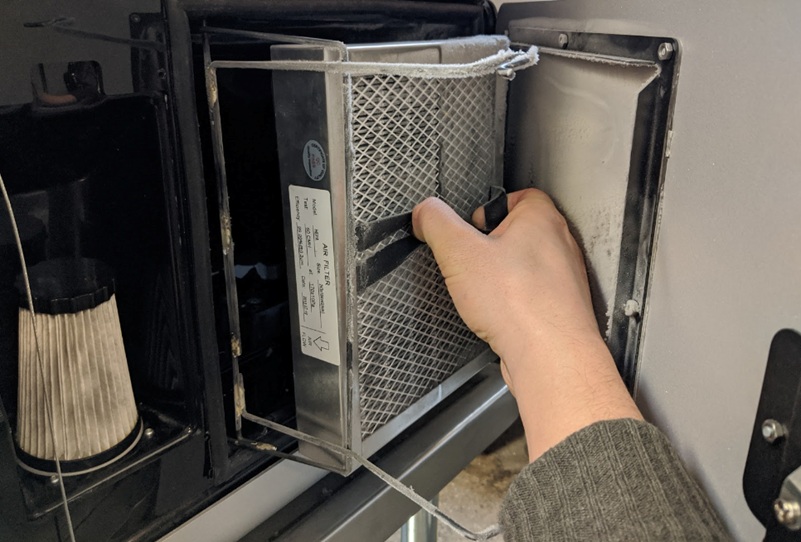
With the retainer moved aside, pull the spent filter straight out using the two fabric pull tabs on its face. The image below shows the filter partially extracted, with the fabric tabs clearly visible as the grip point.
Installing the Replacement Filter
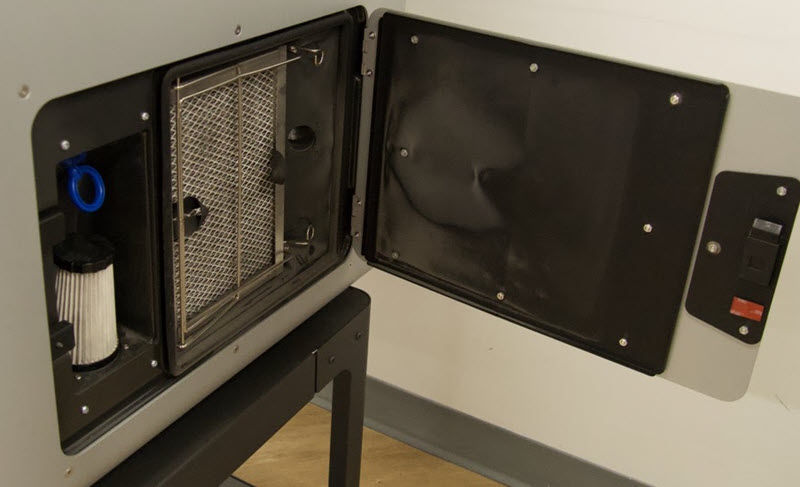
Slide the new exhaust filter into the cabinet slot until it seats fully against the housing. The image below shows the fresh filter resting in position before the retainer is secured.
Clip the wire retainer back around the installed filter, securing both the top and bottom hooks onto their pins. The image below confirms the retainer in its locked position around the new filter.
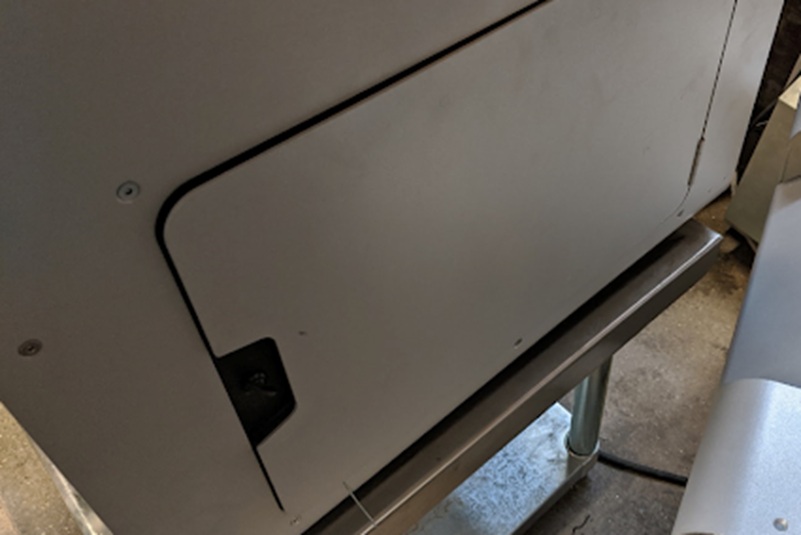
Close the filter cabinet door to complete the procedure. The exhaust fan restarts automatically once the door is latched. The image below shows the cabinet in its closed position.
Tech Tip: Always initiate the replacement via Maintenance → Printer Checklist → Replace Air Filter on the Fuse 1 touchscreen — not manually without logging. The printer uses the logged timestamp to calculate the next cleaning interval. Skipping the touchscreen sequence resets neither the hour counter nor the maintenance reminder, leaving future prompts misaligned with actual filter age.
Technical Specifications of the Fuse Series Replacement Air Exhaust Filter
Compatibility
| Compatible Printers | Fuse 1, Fuse 1+ 30W |
|---|
Maintenance Intervals
| Filter Cleaning Interval | Every 30 hours of printing, or after every 1–2 full build volume prints (whichever comes first) |
|---|---|
| Exhaust Line Purge Interval | After 20 full build volume prints or 900–1000 hours of printing (whichever comes first) |
| Filter Replacement Interval | After 2400 hours of printing |
How to Replace the Exhaust Filter on a Fuse 1 Printer
A step-by-step guide to removing the spent exhaust filter and installing a replacement unit on a Fuse 1 generation SLS printer, using the touchscreen maintenance workflow.
Step 1: Start the Maintenance Procedure on the Touchscreen
Tap Maintenance → Printer Checklist → Replace Air Filter on the Fuse 1 touchscreen. This initiates the guided workflow and logs the replacement event for accurate interval tracking.
Step 2: Open the Filter Cabinet Door
Open the filter cabinet door on the right side of the printer. The exhaust fan shuts off automatically when the door is open — do not attempt to reach into the housing while the air system is running.
Step 3: Vacuum the Exhaust Filter Grate
Using the vacuum hose from the Fuse Sift, clean the filter grate surface before removal. Place the hose against the mesh and move it slowly up and down until all loose powder is extracted from the grate.
Step 4: Unclip the Retainer
Depress the retainer hook at the top of the exhaust filter and disengage it from the pin. Then depress the bottom hook and disengage it from its pin. Move the retainer wire frame fully out of the way.
Step 5: Remove the Spent Exhaust Filter
Grip the two fabric pull tabs on the face of the filter and slide it straight out of the cabinet slot. Set the old filter aside for disposal.
Step 6: Insert the New Exhaust Filter
Slide the new replacement exhaust filter into the cabinet slot until it seats flush against the housing. Ensure it is fully inserted before proceeding.
Step 7: Clip the Retainer Closed
Clip the wire retainer back into place around the new filter, securing both the top and bottom hooks onto their respective pins.
Step 8: Close the Filter Cabinet Door
Close and latch the cabinet door. The exhaust fan restarts automatically. The touchscreen maintenance log is updated to reflect the new filter status.
Frequently Asked Questions — Fuse Series Replacement Air Exhaust Filter
How often does the Fuse 1 exhaust filter need to be replaced?
The exhaust filter should be replaced after 2400 hours of cumulative printing. This is the manufacturer-specified threshold at which filter material becomes too saturated to clean effectively. The Fuse 1 touchscreen tracks print hours and will alert you when the replacement is due.
Can I clean the exhaust filter instead of replacing it?
Yes — routine cleaning by vacuuming the filter grate is recommended every 30 hours of printing or after every 1–2 full build volume prints. However, cleaning only prolongs service life up to the 2400-hour replacement threshold. Beyond that point, internal contamination cannot be removed by vacuuming alone, and replacement is required.
Is this filter compatible with the Fuse 1+ 30W?
Yes. This replacement exhaust filter is compatible with both the Fuse 1 and the Fuse 1+ 30W. It is not compatible with the Fuse 1+ (non-30W) or any other Formlabs printer outside the Fuse 1 generation.
What happens if the exhaust fan is running when I open the filter cabinet?
The exhaust fan shuts off automatically when the filter cabinet door is opened — this is a built-in safety interlock. However, it is still best practice to turn off the air system via the touchscreen before opening the door, to prevent any residual airflow from displacing loose powder during the swap.
Why should I use the touchscreen workflow when replacing the filter?
The touchscreen logs the replacement event and resets the filter hour counter. Replacing the filter manually without completing the touchscreen workflow leaves the maintenance tracker out of sync — future cleaning and replacement prompts will be based on incorrect data, increasing the risk of running a degraded filter beyond its service life.
What is the exhaust line purge, and when is it required?
The exhaust line purge is a deeper maintenance step that clears blockages from the duct lines connected to the exhaust system — separate from filter cleaning. It is required after 20 full build volume prints or 900–1000 hours of printing, whichever comes first. Skipping this step can restrict airflow even with a clean or new filter in place.
Why Choose EXPERT3D?
EXPERT3D has been a specialist in 3D technology since 2012, supporting engineering teams and production departments across Spain with deep technical expertise and direct after-sales assistance. We stock Formlabs Fuse Series consumables including replacement exhaust filters, with fast shipping across Spain and Europe. Our team can advise on maintenance schedules, filter compatibility, and full Fuse Series upkeep. Order directly from our online store with transparent pricing in EUR (€) and full warranty coverage.


 & FDK Bundle – 1-Year Service Plan Included")


