
- Stock: In Stock
- Product code: 00-00012986
- Weight Brutto: 12.00kg
- SKU: PKG-GB-FS1-01
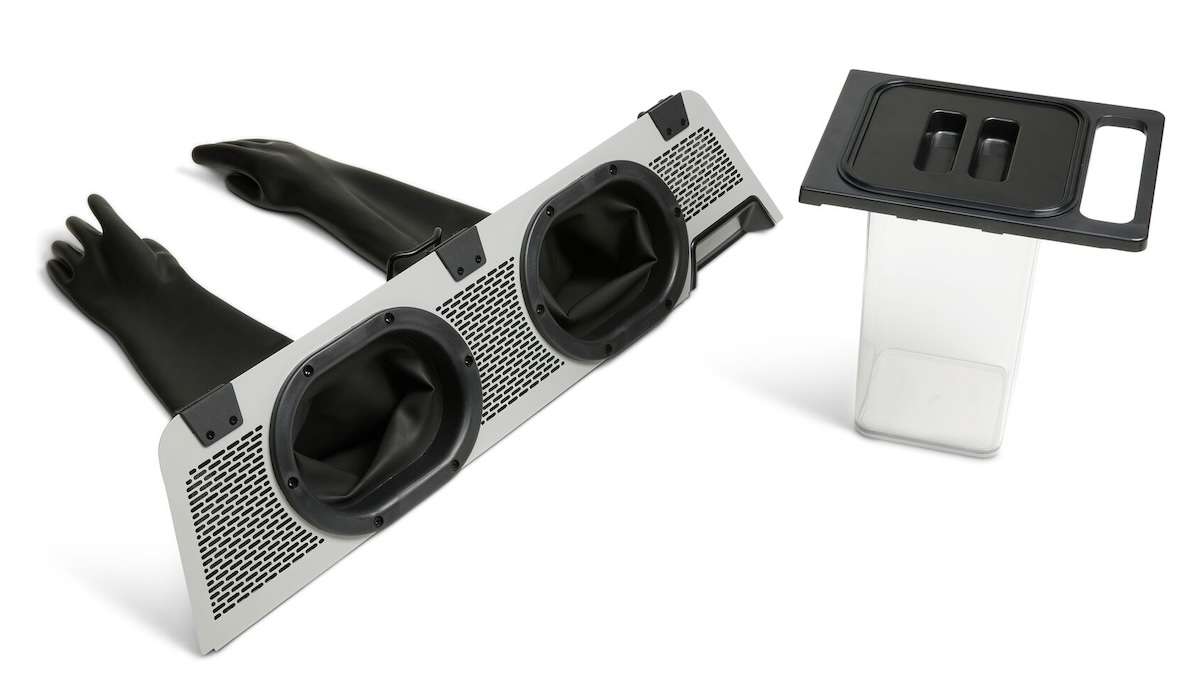
The Formlabs Fuse Sift Glovebox Bundle is a powder containment accessory kit for the Fuse Sift post-processing station, designed to keep SLS powder off your hands and out of your workspace during part extraction. The bundle combines the Fuse Sift Glovebox Panel — a hood-mounted enclosure with integrated rubber gloves — and the Fuse Parts Carrier, a lidded transport container for moving depowdered parts directly to the Fuse Blast or any downstream finishing station. Compatible with the Fuse 1 and Fuse 1+ 30W.
| Compatible Printers | Fuse 1, Fuse 1+ 30W |
|---|---|
| Bundle Contents | Fuse Sift Glovebox Panel + Fuse Parts Carrier |
| Glovebox Mode | Firmware-enabled via touchscreen (Settings › System › Glovebox Mode) |
| Gaskets Included | 2 (1 installed, 1 spare) |
What the Bundle Solves
SLS powder is fine, light, and pervasive. Without containment, every part extraction session leaves a film of nylon dust on tools, surfaces, and skin. The Glovebox Panel mounts directly onto the Fuse Sift hood and fully encloses the work surface, creating a sealed chamber where loose powder stays — not on your bench or in the air. The two integrated glove ports let you work naturally: separate parts from unsintered powder, brush surfaces, and handle prints without contact.
The vent suppression is equally important. When Glovebox Mode is activated through the Fuse Sift touchscreen, the built-in vent fan is suspended during part recovery. Without this setting, the vent creates powder plumes inside the chamber that obscure parts and complicate the extraction process. Mode activation takes three taps: Settings → System → Glovebox Mode → Enable.
Glovebox Panel — Design and Attachment
The Glovebox Panel is a rigid panel with two oval glove ports, clamp hardware, and ventilation mesh on both sides. It slides onto the front edge of the Fuse Sift hood and locks with screw clamps — no tools required for routine removal. A foam gasket adheres to the front lip of the Fuse Sift work surface to seal the gap between the panel and the machine body, preventing powder from escaping at the seam.
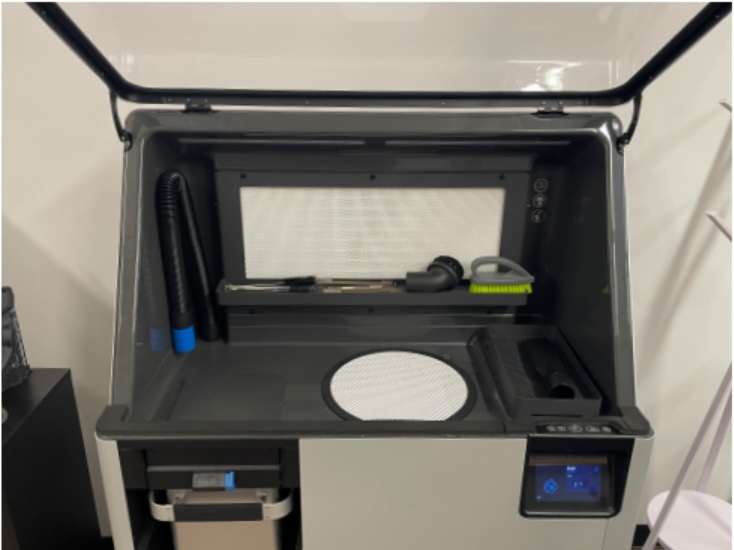
The image below shows the open Fuse Sift before glovebox installation, with the clean, accessible work surface and integrated accessory tray visible.
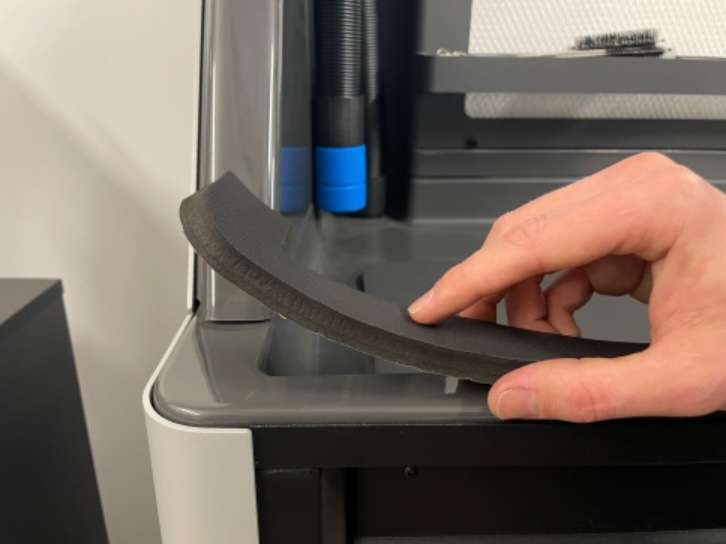
Before mounting the panel, wipe the front lip of the work surface clean. The image below shows the gasket being peeled from its adhesive backing and applied flush to the front lip — it must cover the full width of the lip with no gaps.
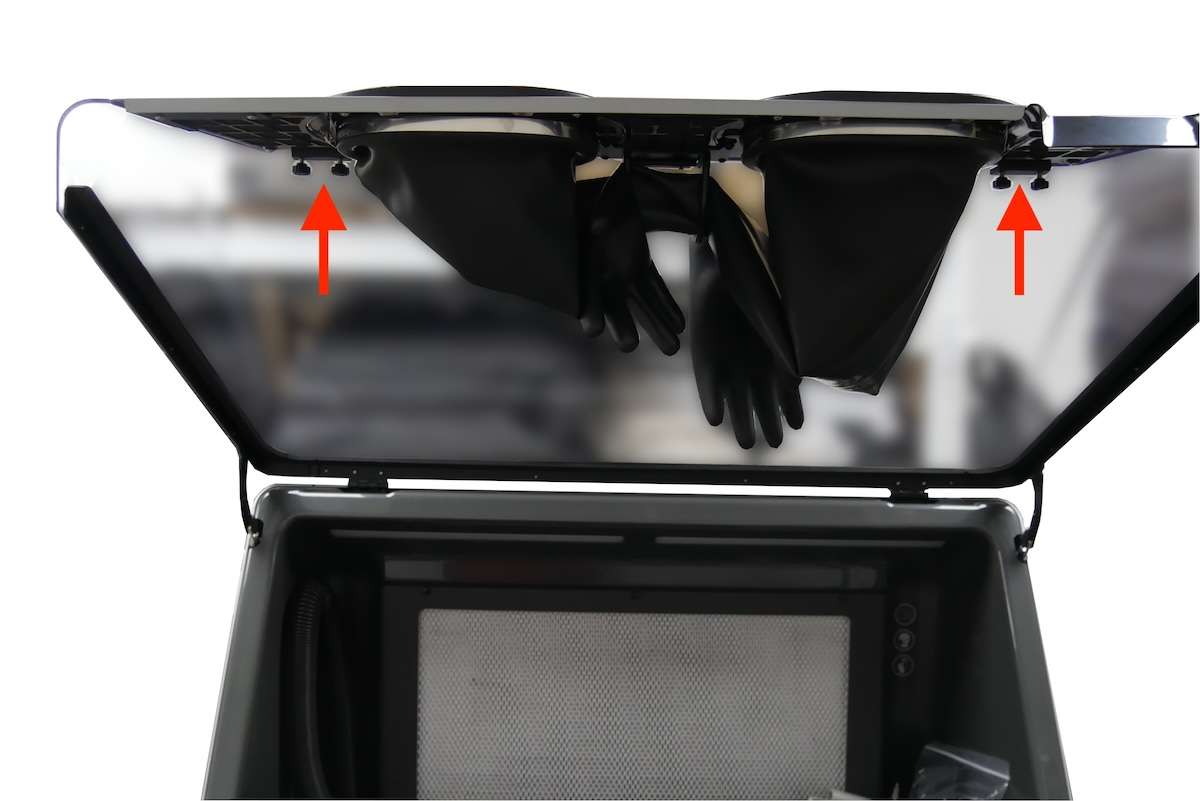
Once the gasket is seated, orient the Glovebox Panel with gloves facing down and clamps facing away. Slide it onto the hood edge until the clamps engage, then tighten finger-tight. The image below shows the panel from inside the open hood, with red arrows indicating the clamp screw locations on both sides.
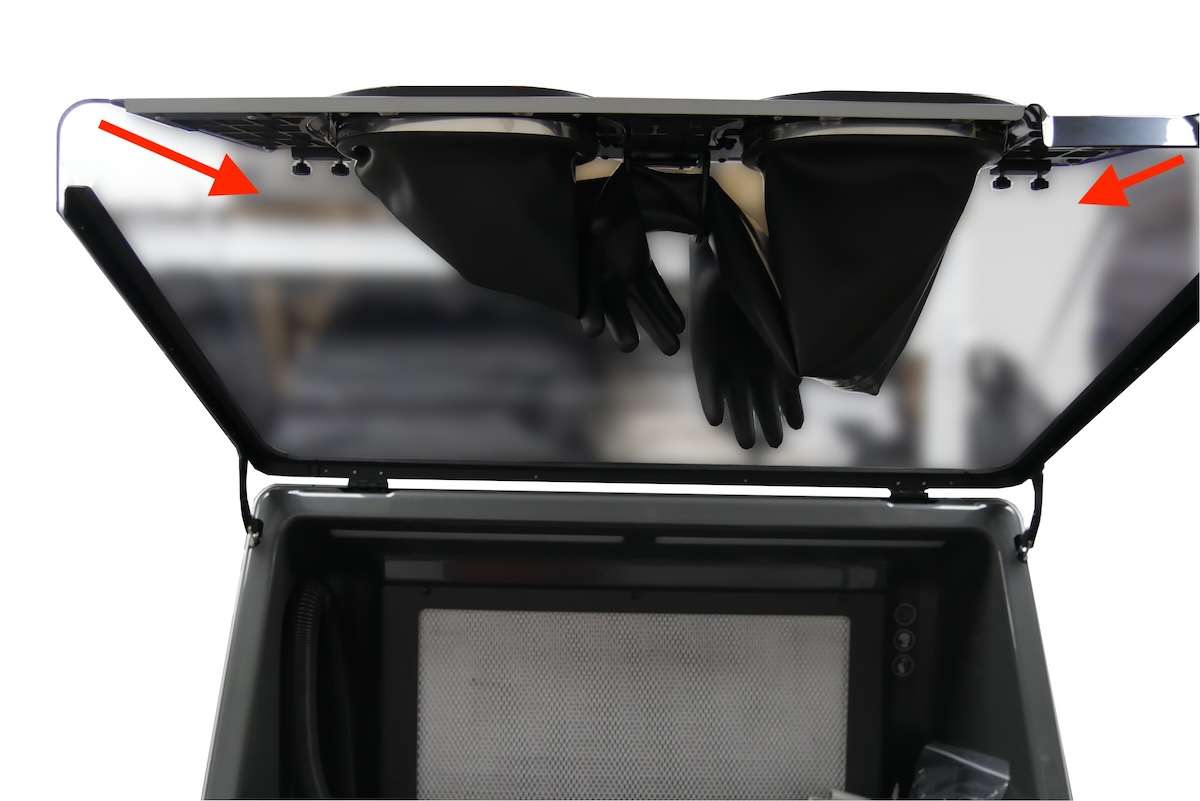
After closing the hood to check the fit and adjusting for minimal gaps, reopen the hood and apply the final torque to the clamp screws. The arrows in the image below point upward toward the screws to indicate the tightening direction.
With the hood closed and the panel secured, the Fuse Sift presents two oval glove ports at the front. The fully installed configuration is shown below — the Formlabs logo is visible through the transparent panel section, and the ventilation mesh flanks both glove openings.

Activating Glovebox Mode via Touchscreen
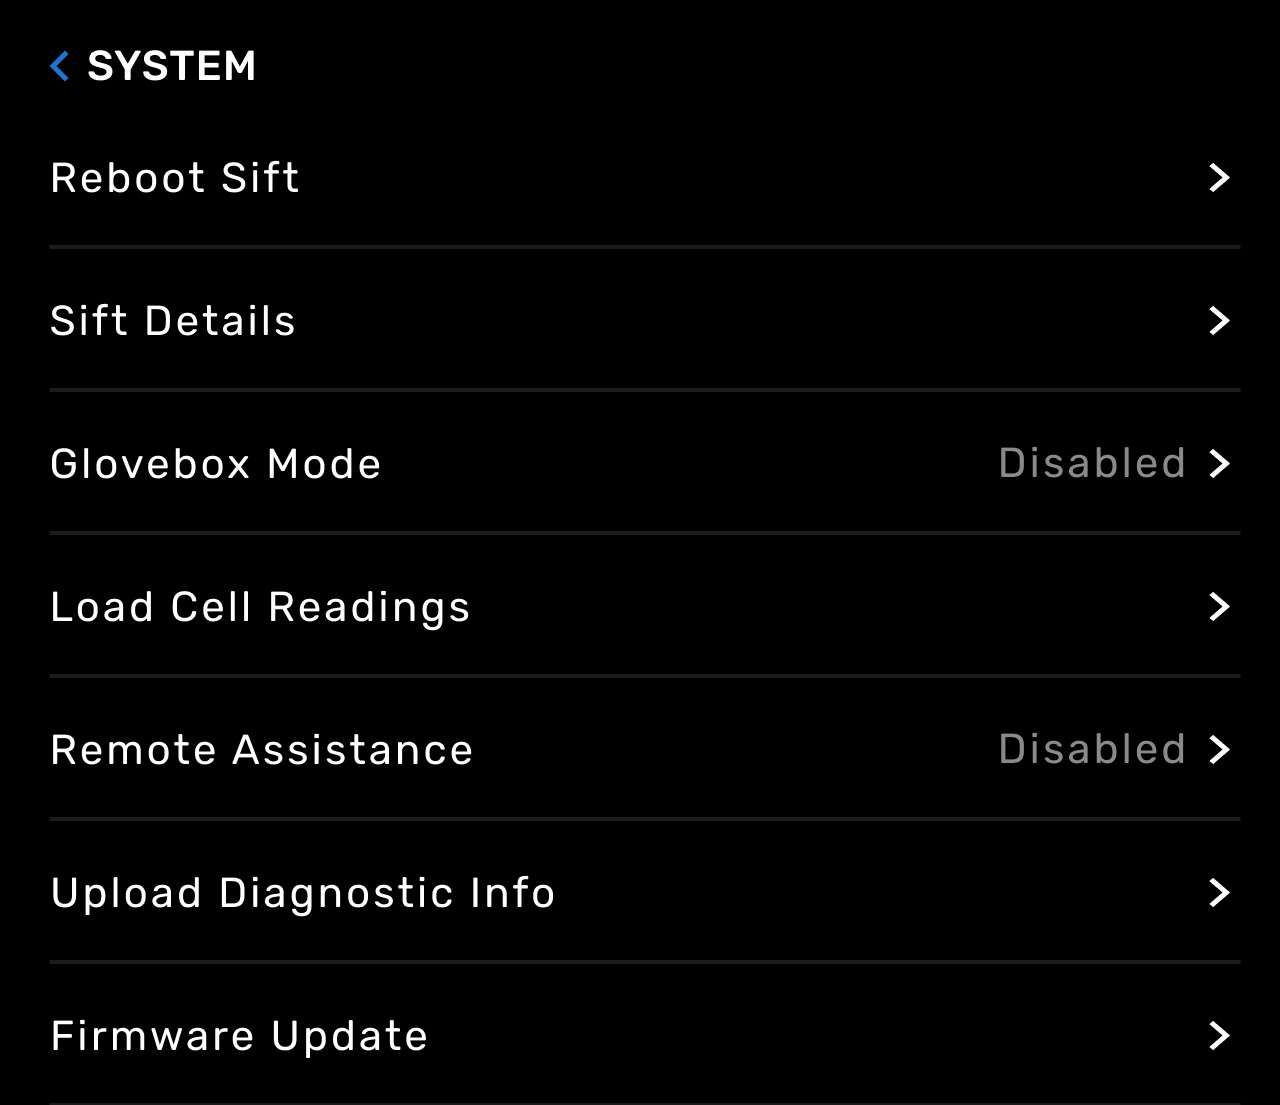
Firmware must be updated before first use. Once updated, navigate to Settings › System › Glovebox Mode on the Fuse Sift touchscreen and tap Enable. This suppresses vent fan operation during part recovery, preventing the powder plumes that make extraction difficult. The screenshot below shows the System menu with the Glovebox Mode entry.
Working Inside the Glovebox
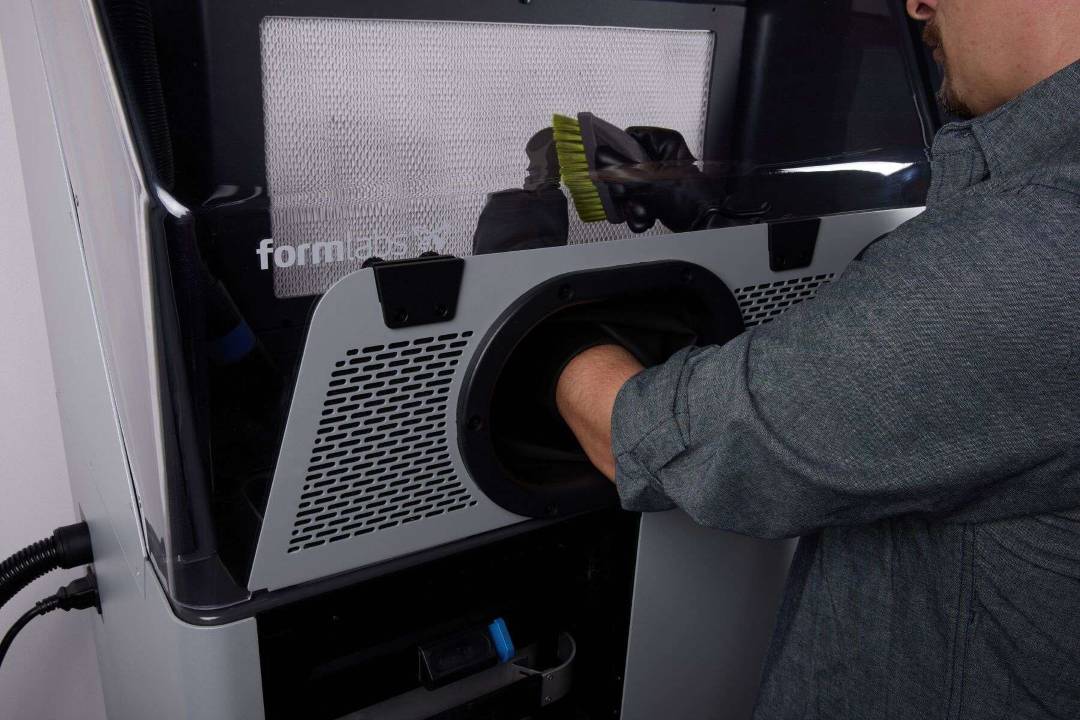
With the build chamber inserted and cake ejected, insert both hands through the glove ports and work normally. Use the sift function to let loose powder fall through the grate, then separate parts manually, with brushes, or with other tools. The image below shows a technician with one arm through a glove port and a brush in the other hand, actively depowdering parts.
Fuse Parts Carrier — Dust-Free Part Transfer
Once parts are separated from unsintered powder inside the glovebox, they need to travel to the Fuse Blast without recontaminating the workspace. The Parts Carrier slots into the Fuse Sift's build chamber enclosure: remove its lid, load your parts, replace the lid, then lift it out and carry it directly to the next station. The transparent body lets you confirm contents without opening.
Glove Maintenance and Replacement
After each session, brush or vacuum excess powder off the gloves before opening the hood — this prevents loose powder from falling onto the work surface or floor. The gloves are replaceable: a hose clamp secures each glove around its port, and a small flathead screwdriver is all that is needed to swap a damaged glove. A technical drawing of the Glovebox Panel with both gloves and hose clamps is shown below.

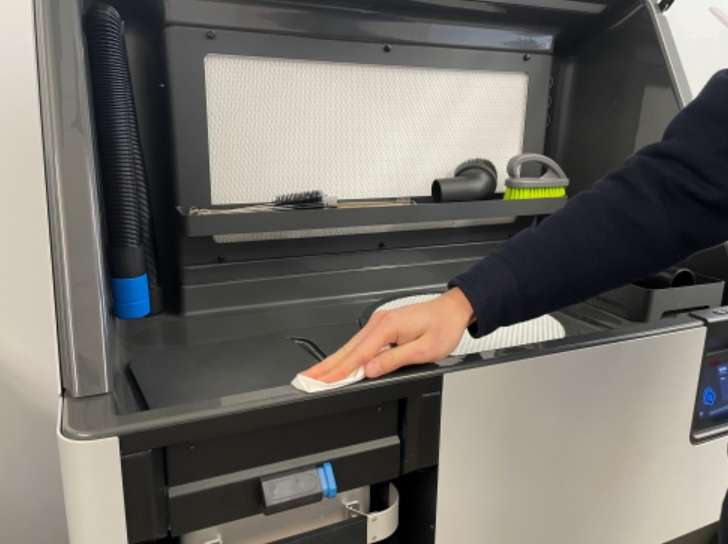
Finally, before cleaning the Fuse Sift work surface lip for gasket installation, use a clean cloth to wipe away any residual powder from the front lip. The image below shows this preparatory cleaning step.
Tech Tip: When opening the Fuse Sift hood between sessions, hang the gloves from the hook on the inner face of the Glovebox Panel or pull them inside-out before lifting the hood. Either method prevents loose powder trapped in the gloves from spilling onto the work surface and undoing the containment the glovebox is designed to provide.
Technical Specifications of the Formlabs Fuse Sift Glovebox Bundle
Compatibility
| Compatible Printers | Fuse 1, Fuse 1+ 30W (Fuse Series) |
|---|---|
| Required Post-Processing Station | Fuse Sift |
| Firmware Requirement | Latest Fuse Sift firmware (update required before first use) |
Glovebox Panel
| Attachment Method | Clamp screws on Fuse Sift hood front edge |
|---|---|
| Glove Ports | 2 (integrated rubber gloves with hose clamp retention) |
| Gaskets Included | 2 (1 installed, 1 spare — adhesive-backed foam) |
| Glovebox Mode | Settings › System › Glovebox Mode › Enable (suppresses vent fan during recovery) |
| Gloves Replaceable | Yes — secured with hose clamps, replaced with flathead screwdriver |
Fuse Parts Carrier
| Function | Dust-free part transport from Fuse Sift to Fuse Blast or finishing station |
|---|---|
| Loading Position | Inserts into Fuse Sift build chamber enclosure |
| Lid | Removable lid with handle for sealed transport |
| Body Material | Transparent (contents visible without opening) |
What's in the Box
- Fuse Sift Glovebox Panel (with integrated rubber gloves)
- Fuse Parts Carrier (with removable lid)
- 2× adhesive foam gaskets (1 for installation, 1 spare)
How to Install the Fuse Sift Glovebox Panel
Step-by-step installation of the Fuse Sift Glovebox Panel onto the Fuse Sift hood, including firmware update, gasket application, panel mounting, and Glovebox Mode activation.
Step 1: Update Firmware and Power Down
Update the Fuse Sift firmware to the latest version. Then turn off the sifter and vent fan if they are currently running, and open the Fuse Sift hood.
Step 2: Clean the Work Surface Lip
Wipe any powder from the front lip of the Fuse Sift work surface with a clean cloth. The gasket must adhere to a clean, dry surface to form an effective seal.
Step 3: Apply the Adhesive Gasket
Peel the adhesive backing from one of the two included gaskets. Press it firmly onto the front lip of the Fuse Sift work surface. Ensure the gasket is flush with the front edge and covers the entire lip without gaps. Set the second gasket aside as a spare.
Step 4: Mount the Glovebox Panel
Orient the Glovebox Panel with gloves facing down and clamps facing away from you. Slide the panel onto the front edge of the Fuse Sift hood until the clamps catch. Tighten the clamp screws until finger-tight.
Step 5: Close, Adjust, and Final-Tighten
Close the Fuse Sift hood and inspect the panel for gaps between it and the machine body. Adjust the panel position as needed to minimize any gaps. Reopen the hood, tighten the clamp screws until snug, then close the hood again.
Step 6: Enable Glovebox Mode
On the Fuse Sift touchscreen, navigate to Settings › System › Glovebox Mode and tap Enable. This disables the vent fan during part recovery, preventing powder plumes inside the work chamber.
Frequently Asked Questions — Formlabs Fuse Sift Glovebox Bundle
Which Fuse printers is the Glovebox Bundle compatible with?
The Fuse Sift Glovebox Bundle is compatible with the Fuse 1 and Fuse 1+ 30W. It attaches to the Fuse Sift post-processing station, which is used with both printer models.
Is a firmware update required before installing the Glovebox?
Yes. The Fuse Sift firmware must be updated to the latest version before installing and using the Glovebox. The Glovebox Mode setting — which suppresses the vent fan during part recovery — is only available after the firmware update.
Why must Glovebox Mode be enabled on the touchscreen?
When the Fuse Sift vent fan runs during part recovery inside the glovebox, it generates powder plumes within the enclosed chamber. These plumes make it significantly harder to locate and extract printed parts. Enabling Glovebox Mode suspends the vent fan specifically during the recovery phase to maintain clear visibility and clean working conditions inside the enclosure.
Can the gloves be replaced if they tear?
Yes. The gloves are held in place by hose clamps around the base of each glove port. To replace a damaged glove, loosen the hose clamp with a small flathead screwdriver, remove the clamp and glove, slide the replacement glove over the port lip (thumb oriented inward), and re-tighten the hose clamp. Replacement gloves are available separately.
How do I use the Parts Carrier after depowdering?
After separating parts from unsintered powder inside the glovebox, insert the Parts Carrier into the Fuse Sift's build chamber enclosure and remove its lid. Place your parts inside, replace the lid, then remove the carrier from the Fuse Sift and transport it directly to the Fuse Blast or any other finishing station. The transparent body lets you verify the contents without opening the carrier.
How should I clean the gloves before opening the hood?
Before opening the Fuse Sift hood after a recovery session, brush or vacuum any excess powder off the gloves. This prevents loose powder trapped in the gloves from falling onto the work surface when the hood is raised. As an alternative, pull the gloves inside-out or hang them from the hook on the inner face of the Glovebox Panel before lifting the hood.
Why Choose EXPERT3D?
EXPERT3D has been a specialist in 3D technology since 2012, supporting engineering teams and production departments across Spain with hands-on technical expertise and direct aftersales care. We stock Formlabs SLS accessories including the Fuse Sift Glovebox Bundle and provide rapid shipping across Spain and Europe. Our team advises on post-processing workflows, accessory compatibility, and consumable selection. Order directly from our online store with transparent pricing in EUR (€) and full warranty coverage.

, Jade White")
")
")


 & FDK Bundle – 1-Year Service Plan Included")


