")
")


- Stock: In Stock
- Product code: 00-00000148
- Weight Brutto: 15.00kg
- SKU: BC-FS1-230V-02
The Fuse Series Build Chamber 230V is a modular SLS print container designed for cyclical, nonstop production workflows on the Fuse 1 generation of SLS printers. Compatible with both the Fuse 1 and Fuse 1+ 30W, it enables parallel operation: while one chamber is printing, a second can be cooling, unpacking, and reclaiming powder in the Fuse Sift — eliminating downtime between jobs.
| Compatible Printers | Fuse 1, Fuse 1+ 30W |
|---|---|
| Voltage | 230 V |
| Felt Seal Maintenance Interval | Every 500 hours of printing |
| Gasket Replacement Interval | Every 1,000 hours of printing |
Why a Second Build Chamber Changes Your SLS Workflow
Every Fuse 1 generation printer ships with one build chamber — but a single chamber creates a hard bottleneck. After a print job finishes, the chamber must cool, be transferred to the Fuse Sift for unpacking, and then cleaned before the next job can start. That sequence can take hours. Adding a second Fuse Series Build Chamber breaks that constraint entirely: load a fresh chamber straight after removing the completed one and the printer is back in action within minutes.
This is the core logic behind the Formlabs modular ecosystem. Powder cartridges and build chambers transfer between the Fuse 1 and Fuse Sift as interchangeable units, creating a genuinely cyclical workflow rather than a linear one. For production environments where the printer runs multiple jobs per day, the build chamber is the highest-impact single accessory in the Fuse lineup.
The Felt Seal: The Component That Keeps Your Prints Clean
The felt seal encircling the print bed is a critical Z-axis accuracy component. Its job is straightforward: prevent unsintered powder from leaking around the piston during a build. When the felt becomes occluded with compacted powder, the print bed can no longer travel freely — resulting in layer registration errors and, in severe cases, Z-axis jamming that stops a job mid-print.
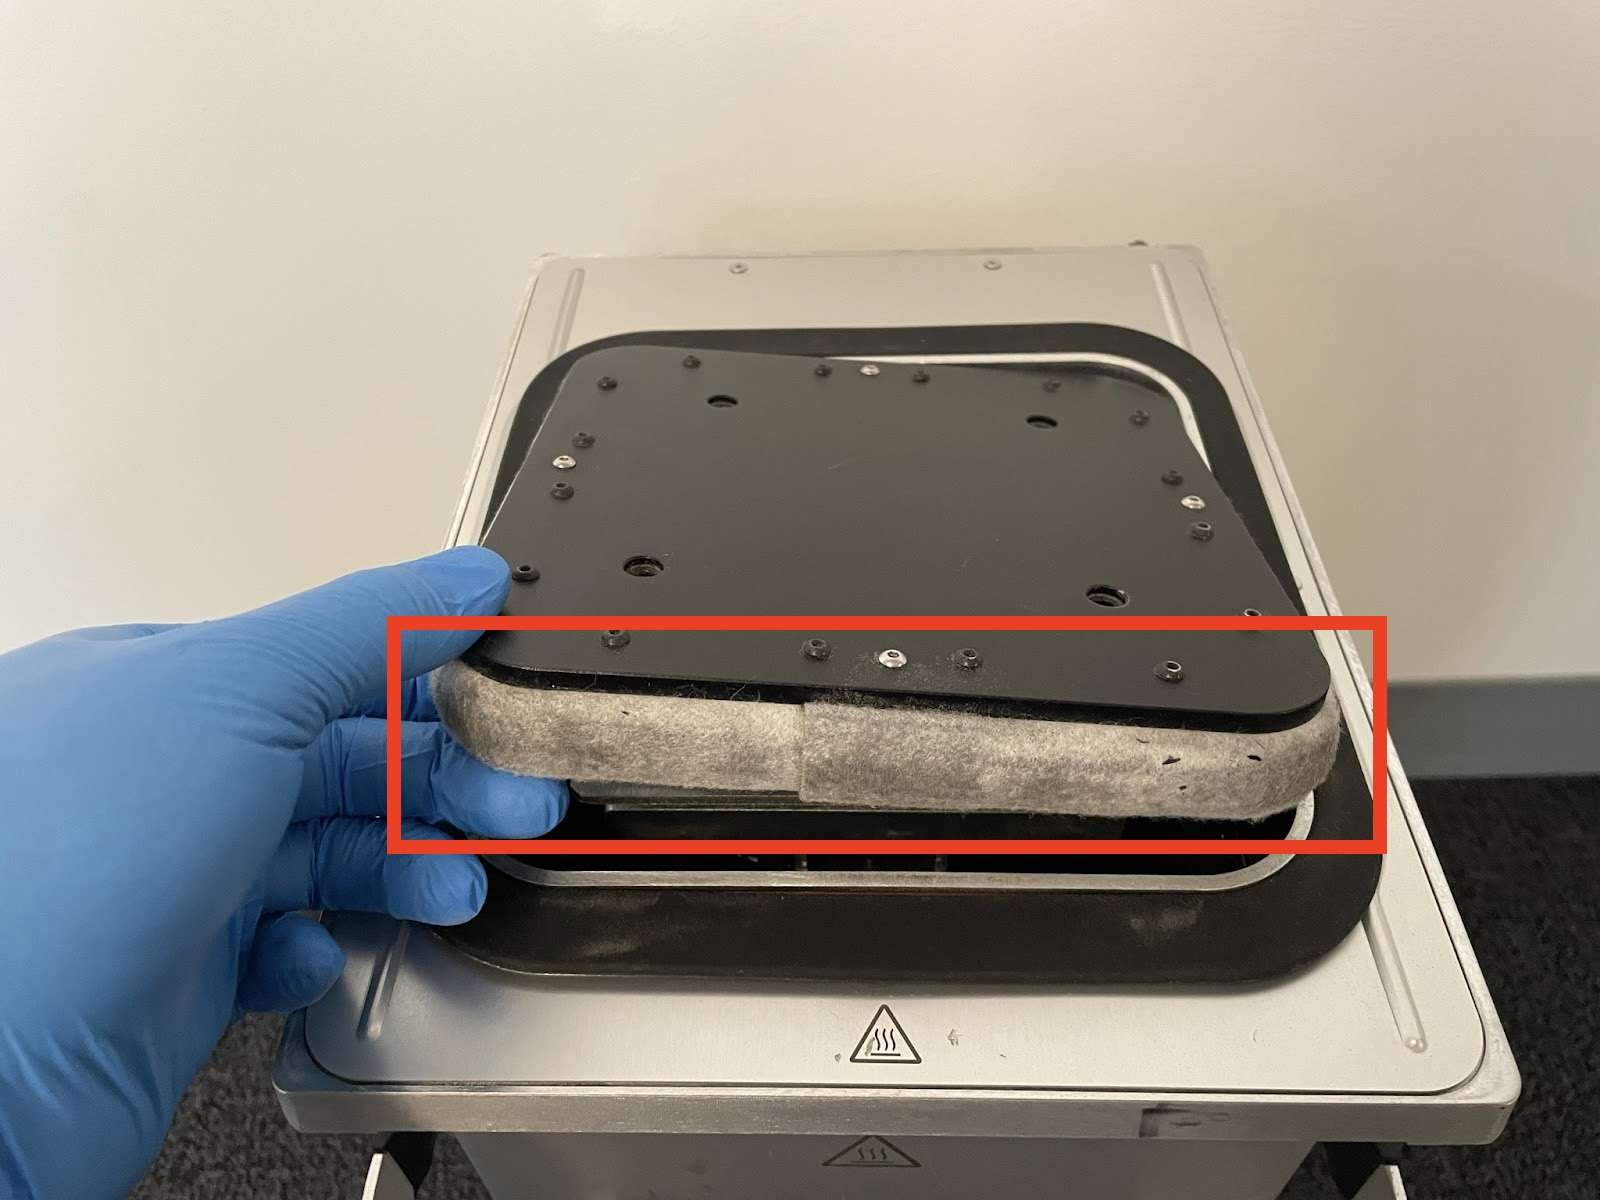
Formlabs specifies felt seal cleaning after every 500 hours of printing. The procedure requires removing the four M4 button-head screws (12 mm, tightened with a 2.5 mm hex driver), lifting the print bed with a putty knife, and vacuuming the felt with a crevice attachment. Never use compressed air for this step — mobilizing loose particles raises inhalation risk.
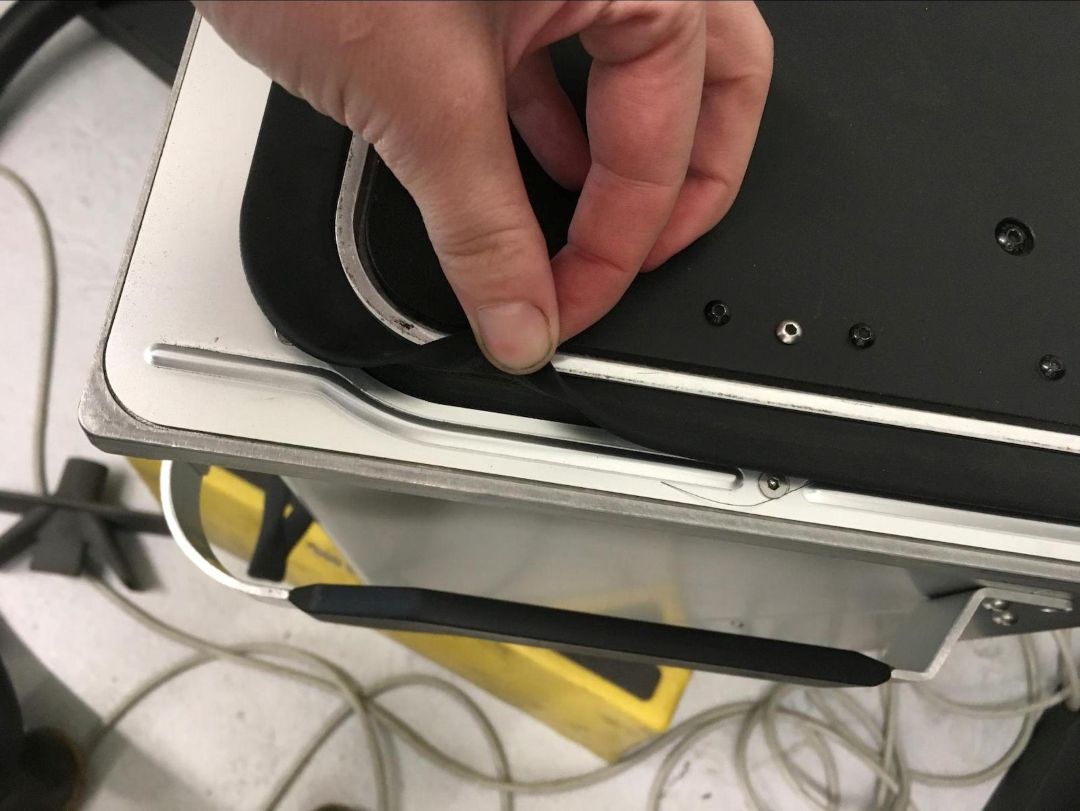
Use a putty knife at the gap between the underside of the print bed and the white felt seal. Gently lever each edge upward in sequence, rotating the build chamber 90° between attempts, until the print bed lifts free.

Inspecting and Replacing a Worn Felt Seal
Once the print bed is removed, inspect the felt visually. Two conditions require immediate replacement rather than cleaning: a visible tear in the felt material, and melted or fused powder that cannot be vacuumed away. Either condition compromises the seal's ability to contain powder during future builds.
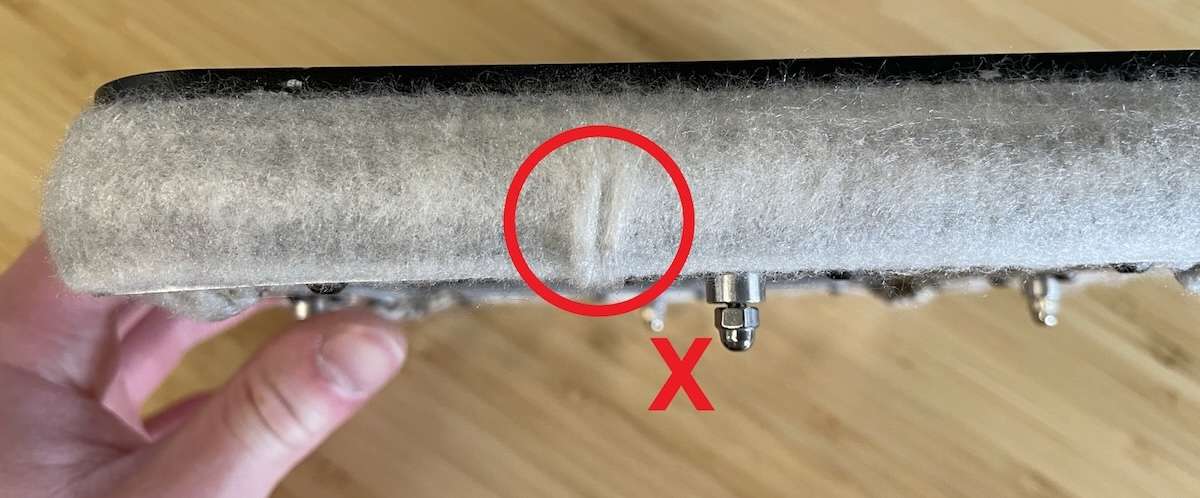
Melted powder fused into the felt cannot be removed by vacuuming alone. The image below shows a severely contaminated seal — the entire felt strip is clogged with sintered material. In this state, the seal must be replaced as part of the print bed assembly.

Reinstalling the Print Bed: Orientation Matters
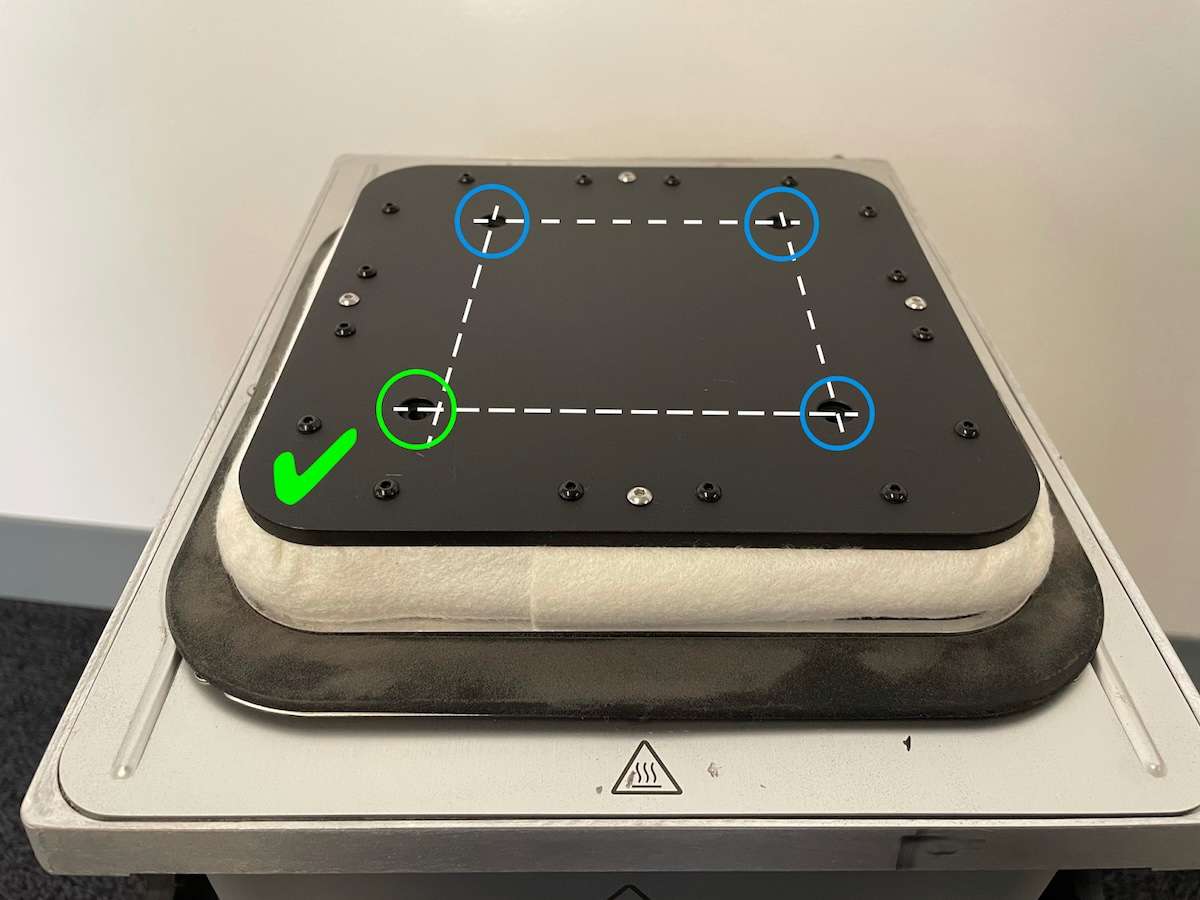
When fitting the print bed back onto the build chamber piston, orientation is not symmetric. One of the four screw holes is offset — it must align with the front-left corner of the build chamber. Fitting the bed in the wrong orientation rotates it 90° and the offset hole will not align with its threaded insert, preventing the screws from seating correctly.
The incorrect orientation places the offset hole at the front-right instead of front-left. The red X in the image below shows this rotated configuration — the misaligned screw is circled in red.
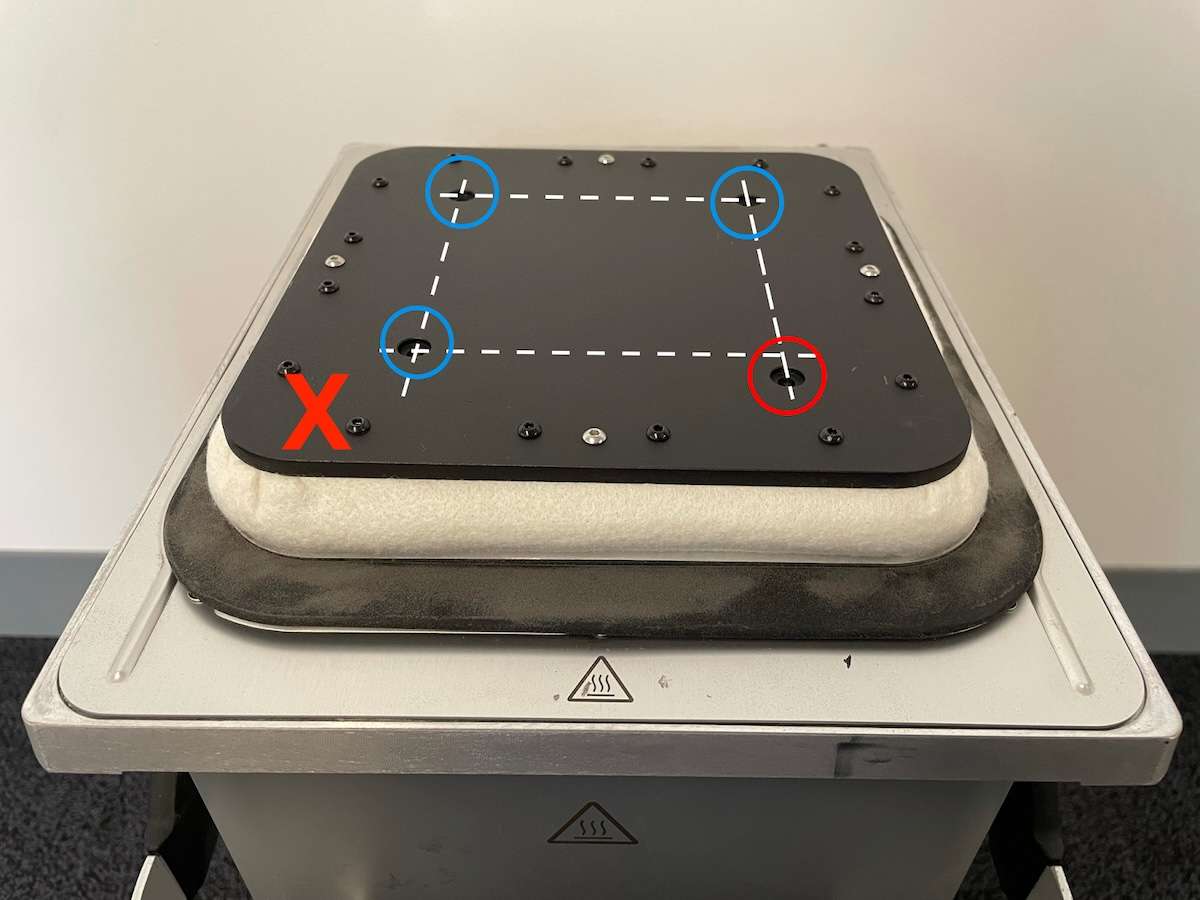
With the orientation confirmed, press the print bed into the build chamber by pushing down on each corner one at a time. Apply firm, even pressure — the bed must seat fully against the felt seal before screwing it down.
Cleaning All Powder Out — Material Switching Protocol
When switching between incompatible powder types, the build chamber requires a full deep clean before the first run with the new material. Residual powder from the previous material will contaminate the new batch — causing discoloration, reduced mechanical properties, or outright print failure. Formlabs recommends using a dedicated build chamber per powder type to avoid this risk entirely.
One important exception: you do not need to deep-clean when switching between Nylon 12 Powder and Nylon 12 GF Powder, or between Nylon 11 Powder and Nylon 11 CF Powder. For all other material transitions, full cleaning is mandatory.
The gap between the print bed and the inner walls of the build chamber is the most difficult area to clean — powder accumulates here and resists vacuuming alone. Use compressed air or a gas duster to blow powder out of this gap while keeping the vacuum running simultaneously to capture any mobilized particles.
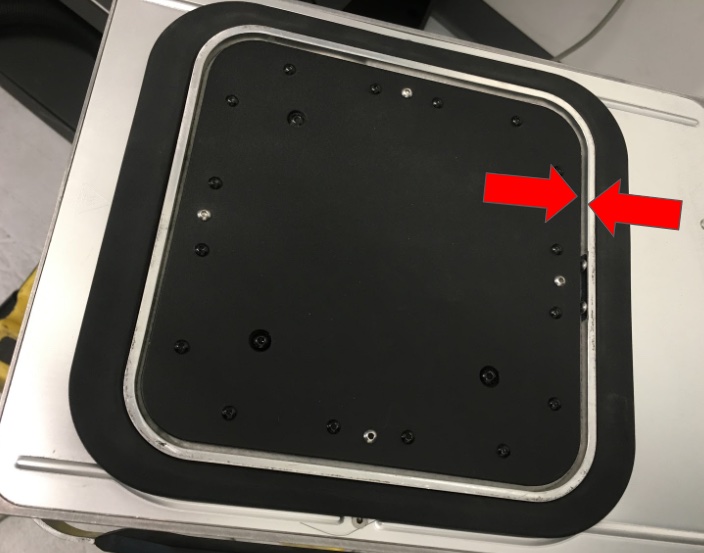
After the gap is cleared, lift the outside edge of the gasket encircling the print bed and vacuum any powder that has accumulated underneath it. This area is easy to overlook but critical — trapped powder here can contaminate the new material from the very first build.
Tech Tip: Label each build chamber with its dedicated powder type using permanent marker or adhesive label on the chamber body. Formlabs strongly recommends one chamber per material to avoid contamination. When you do need to deep-clean a chamber for a material switch, replace the print bed assembly at the same time — residual powder embedded in the bed can contaminate prints with the new material even after thorough cleaning of the chamber walls.
Technical Specifications of the Fuse Series Build Chamber 230V
Compatibility
| Compatible Printers | Fuse 1, Fuse 1+ 30W (Fuse 1 Generation) |
|---|---|
| Voltage | 230 V |
Maintenance Schedule
| Felt Seal Cleaning | Every 500 hours of printing |
|---|---|
| Inner Gasket (Volcano Sheet Seal) Replacement | Every 1,000 hours of printing |
| External Frame Gasket Replacement | Every 1,000 hours of printing |
| Lead Screw Lubrication | Every 1,000 hours of printing |
Print Bed Fasteners
| Print Bed Screws | 4 × M4 button head, 12 mm |
|---|---|
| Required Tool (Hex Driver) | 2.5 mm hex driver (flat-end) |
Cleaning Supplies
| Approved Cleaning Method | Vacuum (Class II Div 2) with crevice attachment; nylon brush; microfiber cloth |
|---|---|
| Prohibited Cleaning Method | IPA or any solvent; compressed air inside print enclosure |
| Felt Seal Cleaning Time (est.) | 10 minutes |
| Full Powder Changeover Clean Time (est.) | 30 minutes |
Storage
| Recommended Storage | Inside Fuse 1, Fuse Sift, or on a clean flat surface — away from dust and debris |
|---|
What's in the Box
- Fuse Series Build Chamber 230V × 1
How to Clean the Fuse 1 Generation Build Chamber Felt Seal
A step-by-step procedure for accessing, vacuuming, and reinstalling the felt seal on a Fuse 1 generation build chamber — required every 500 hours of printing to prevent Z-axis layer registration issues.
Step 1: Empty the Build Chamber
If the build chamber contains a powder cake from a recent print, insert it into the Fuse Sift and use the Unpack function to lift the print bed and eject the cake. Remove the build chamber from the Fuse Sift before proceeding.
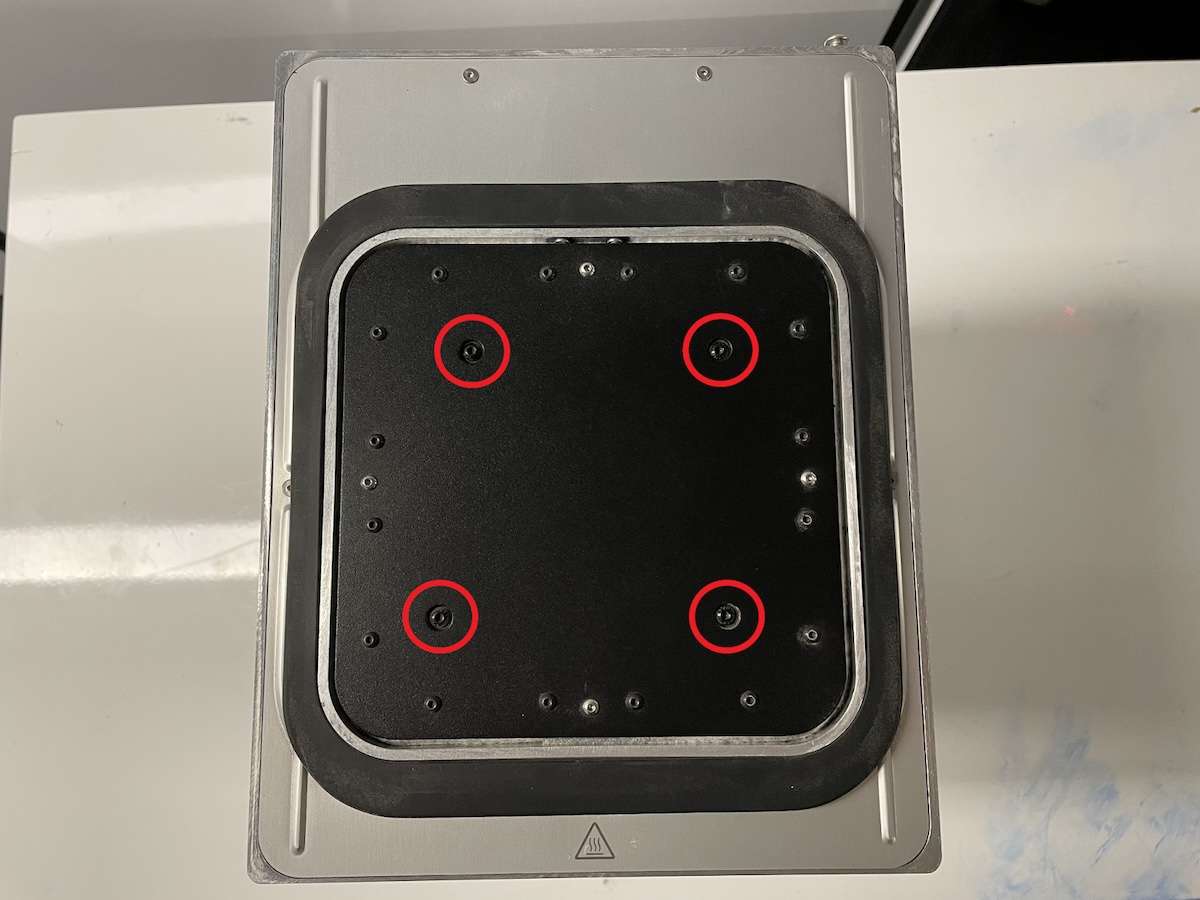
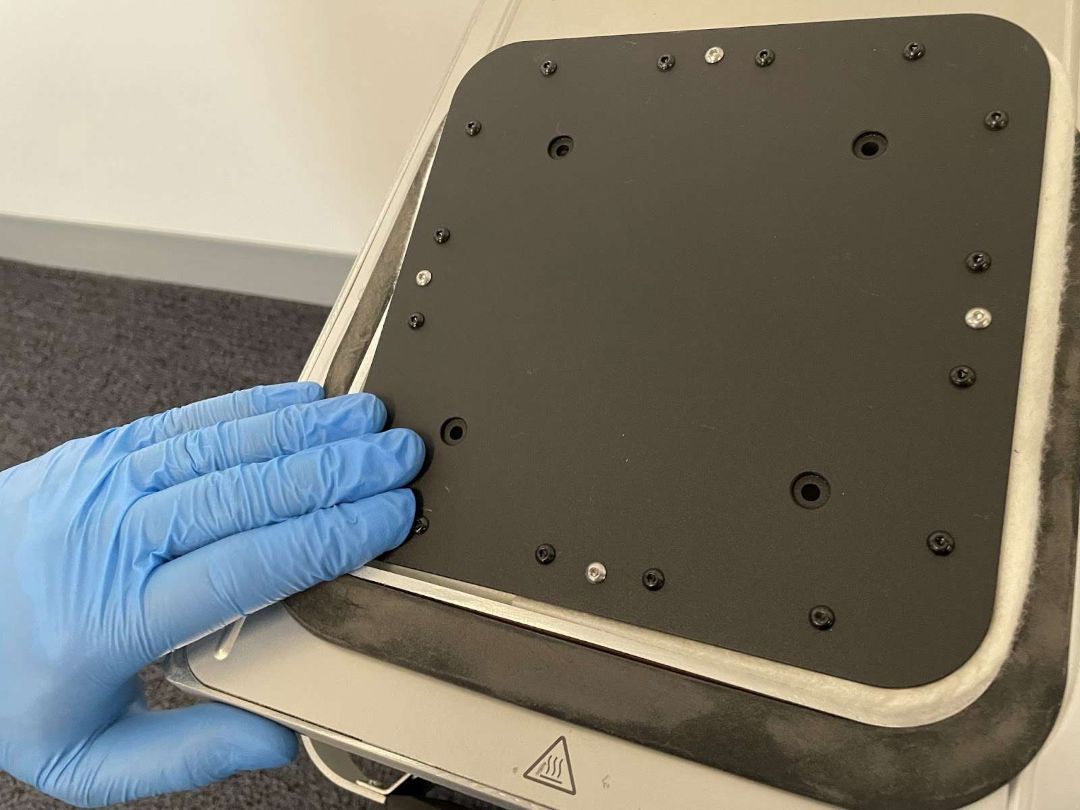
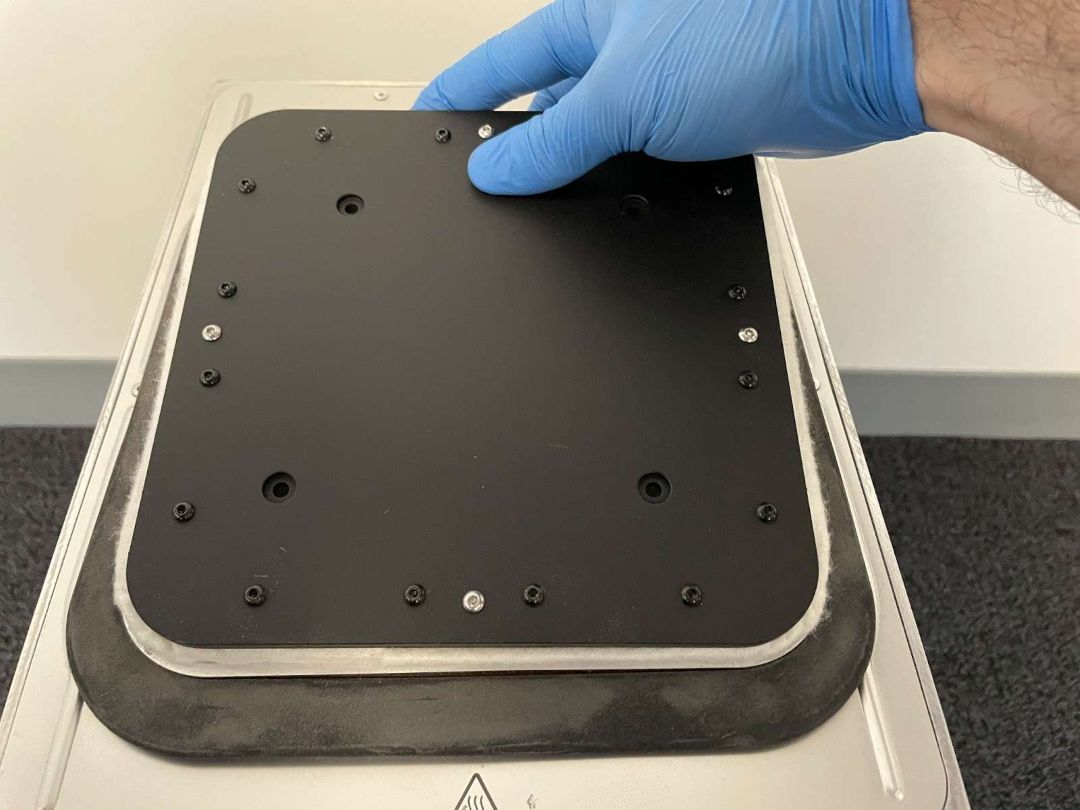
Step 2: Remove the Print Bed Screws
Using a 2.5 mm hex driver, remove the four 12 mm M4 button-head screws securing the print bed to the build chamber piston top.
Step 3: Lift the Print Bed
Carefully wedge a putty knife into the gap between the underside of the print bed and the white felt seal. Gently lever the edge upward. Rotate the build chamber 90° and repeat on each side until the print bed can be fully lifted off.
Step 4: Vacuum the Felt Seal
Using a vacuum with a crevice attachment, vacuum as much powder from the felt seal as possible. Use a scrubbing motion to break apart compacted clumps. Do not use compressed air — this mobilizes particles and creates an inhalation hazard.
Step 5: Inspect the Felt for Damage
Examine the felt for tears or melted, fused material that cannot be removed by vacuuming. If either condition is present, replace the print bed assembly rather than reinstalling the damaged felt seal.
Step 6: Reinstall the Print Bed
Place the print bed onto the piston top with the offset screw hole at the front-left corner of the build chamber. Press down on each corner one at a time until the bed is fully seated. Thread and firmly tighten the four M4 screws with the 2.5 mm hex driver.
Frequently Asked Questions — Fuse Series Build Chamber 230V
Which Formlabs printers is the Fuse Series Build Chamber 230V compatible with?
The Fuse Series Build Chamber 230V is compatible with the Fuse 1 and Fuse 1+ 30W — collectively the Fuse 1 generation. It is not compatible with other Formlabs SLA or photopolymer printers.
How many build chambers do I need for a continuous SLS workflow?
At minimum, two build chambers are needed for a genuinely continuous workflow. With one chamber printing and a second simultaneously cooling and being unpacked in the Fuse Sift, you can load fresh powder and start the next job immediately after the previous build completes — eliminating the waiting period between runs.
How often should the build chamber felt seal be cleaned?
Formlabs specifies felt seal cleaning after every 500 hours of printing. The printer tracks this interval automatically and alerts you when the task is due. Delaying this maintenance can lead to layer registration issues and Z-axis jamming.
Can I use the same build chamber with different powder types?
Formlabs strongly recommends dedicating one build chamber per powder type. If you need to switch materials in the same chamber, a full deep-clean procedure (approximately 30 minutes) is required, and the print bed should also be replaced. One exception: switching between Nylon 12 Powder and Nylon 12 GF Powder, or between Nylon 11 Powder and Nylon 11 CF Powder, does not require a full deep-clean.
Can I clean the build chamber with IPA or solvents?
No. Formlabs explicitly prohibits cleaning the build chamber with IPA or any other solvent. Use only a vacuum (Class II, Division 2 or equivalent), a nylon brush for residue, and a damp microfiber cloth for wiping surfaces. Only materials and processes approved by Formlabs or a certified service provider are permitted.
What happens if the print bed is installed in the wrong orientation?
The print bed has one offset screw hole that must align with the front-left corner of the build chamber. Installing it rotated 90° means the offset hole does not match its threaded insert, so the screws cannot be fully seated. Always verify orientation before tightening — the offset hole at front-left is the confirmation signal.
Why Choose EXPERT3D?
EXPERT3D has been a specialist in 3D technology since 2012, supporting engineering teams and production departments across Spain with hands-on technical expertise. We stock Formlabs SLS accessories including the Fuse Series Build Chamber and provide fast shipping across Spain and Europe. Our team advises on printer compatibility, workflow optimization, and maintenance scheduling. Order directly from our online store with transparent pricing in EUR (€) and full official warranty coverage.
")
")


")
")


 & FDK Bundle – 1-Year Service Plan Included")


